


By Matteo Giordano
TL;DR
WebAuthn traffic is a wall of opaque bytes. The fields you want to reach are buried in CBOR (Concise Binary Object Representation), and the CBOR is usually buried under one or two layers of Base64 before it reaches the wire, making it very hard to manually run all the checks you actually want to run.
Passkey Editor is a Burp extension that detects a registration or authentication ceremony, unwraps the encoding chain, decodes the CBOR into a dedicated tab across Proxy and Repeater (editable wherever the request is still in flight), and drives the routine ceremony-layer attacks from an "Attacks" dropdown.
The code is at github.com/anvilsecure/passkey-editor.
Why I built it
The first time I tried to test a passkey flow on a real engagement, I got maybe ten minutes in and stopped. You proxy the login, you find the POST carrying the assertion, and then there's nothing to work with. The body is essentially a blob and Burp's decoders get you partway: clientDataJSON unwraps to readable JSON you can tamper with in the Inspector. However, the fields that are crucial for the ceremony don't unwrap so easily: authData and the attestation object come back as CBOR, which nothing in Burp will read or edit, so past that layer, you're fuzzing blind.
What I wanted was what the JWT Editor family did for JSON Web Tokens: a tab that shows up on the interesting request, decodes it into something you can change, and puts it back on the wire in a form the server still accepts. I wasn't satisfied with what was out there, so I started building my own.
The problem: WebAuthn is opaque over the wire
Let me be specific about why passkey traffic resists Burp.
A WebAuthn ceremony doesn't ship clean and undecoded JSON. The authenticator data, the attestation object, and the public key are CBOR, a binary serialization Burp has no native view for. That alone would be manageable, but the complication is that relying parties (RPs) almost never put raw CBOR on the wire. They Base64-encode it first, often twice, mixing url-safe and standard alphabets and padded and unpadded variants in the same request, and some wrap the result in a JSON envelope with their own field names.
So there's no single format to target... everybody rolled their own, and ideally you'll need to unwrap each one of them.
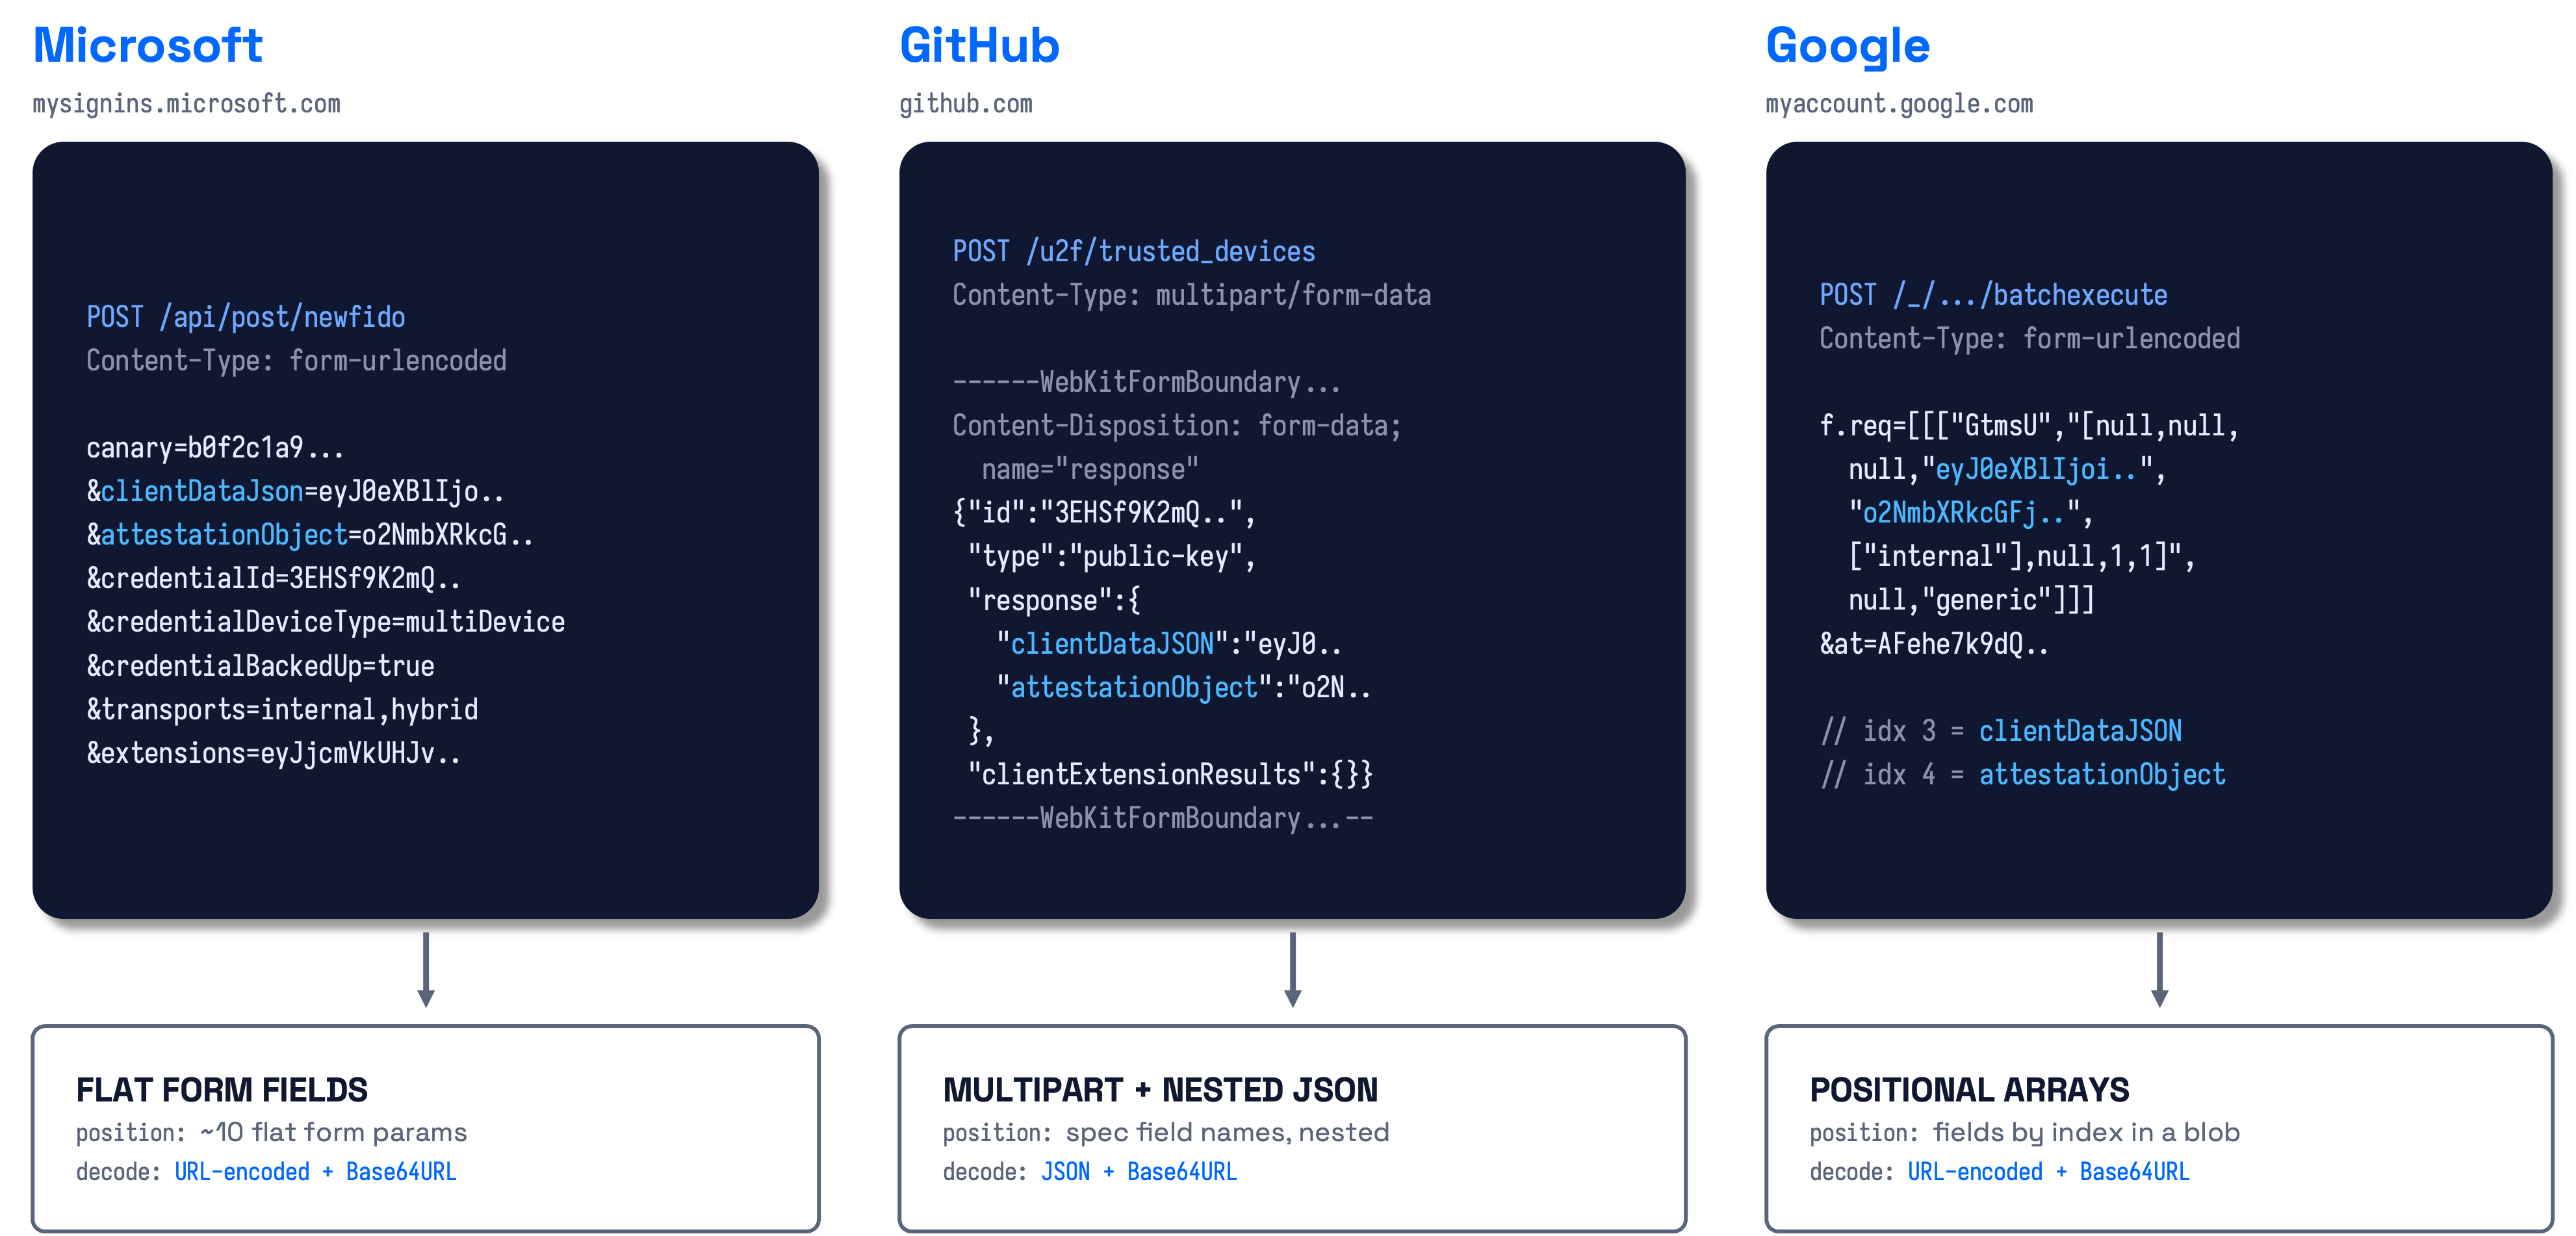
Here's the same ceremony as three real deployments send it: (1) Microsoft explodes the WebAuthn response into flat form parameters, (2) GitHub keeps the spec's field names but nests them in JSON inside a multipart body, and (3) Google hides the identical fields inside a stringified positional array in its batchexecute remote procedure call (RPC) endpoint, with no field names at all, just indexes, then URL-encodes the whole thing. Three encodings that share almost nothing, carrying the same fields.
I walked through the byte-level structure of all of this in Part 1 of the series: the authData layout, the flags byte, the rpIdHash, clientDataJSON and its origin binding, so I won't repeat it here.
The point for tooling is that by the time you've peeled the wrappers and parsed the CBOR by hand, the ceremony is over and the challenge you meant to tamper with has likely expired.
Here's a registration body straight off the wire, in one of the plenty of ways it can come to you.
{
  "username": "demo_user",
  "response": {
    "id": "SZNyIn7tWd5VQQryYcmtZpBSzA31paGNkqwz-yHSFtM",
    "rawId": "SZNyIn7tWd5VQQryYcmtZpBSzA31paGNkqwz-yHSFtM",
    "response": {
      "attestationObject": "o2NmbXRkbm9uZWdhdHRTdG10oGhhdXRoRGF0YViBdKbqkhPJnC90siSSsyDPQCYqlMGpUKA5fyklC2CEHvBFAAAAAQECAwQFBgcIAQIDBAUGBwgAIEmTciJ-7VneVUEK8mHJrWaQUswN9aWhjZKsM_sh0hbTpAEBAycgBiFYIENoOm9EGQHj8Y76oGP56jdEtLCtep-dA8fPwc9oWZvH",
      "clientDataJSON": "eyJ0eXBlIjoid2ViYXV0aG4uY3JlYXRlIiwiY2hhbGxlbmdlIjoidmpSeGJHbC16MG11N2FpRFNROGRtT3dBcEQzLWRpUHRURDFjN2ZvRkdYMlNBZk5HZVJhclZyZnMyT2hZVkhtUEI0NFJ5YjEzMEZIMUhrV2tiZ2hPQ0EiLCJvcmlnaW4iOiJodHRwczovL3dlYmF1dGhuLmlvIiwiY3Jvc3NPcmlnaW4iOmZhbHNlLCJvdGhlcl9rZXlzX2Nhbl9iZV9hZGRlZF9oZXJlIjoiZG8gbm90IGNvbXBhcmUgY2xpZW50RGF0YUpTT04gYWdhaW5zdCBhIHRlbXBsYXRlLiBTZWUgaHR0cHM6Ly9nb28uZ2wveWFiUGV4In0",
      "transports": ["internal"],
      "publicKeyAlgorithm": -8,
      "publicKey": "MCowBQYDK2VwAyEAQ2g6b0QZAePxjvqgY_nqN0S0sK16n50Dx8_Bz2hZm8c",
      "authenticatorData": "dKbqkhPJnC90siSSsyDPQCYqlMGpUKA5fyklC2CEHvBFAAAAAQECAwQFBgcIAQIDBAUGBwgAIEmTciJ-7VneVUEK8mHJrWaQUswN9aWhjZKsM_sh0hbTpAEBAycgBiFYIENoOm9EGQHj8Y76oGP56jdEtLCtep-dA8fPwc9oWZvH"
    },
    "type": "public-key",
    "clientExtensionResults": { "credProps": { "rk": true } },
    "authenticatorAttachment": "platform"
  }
}
At the end of the day, what you want to see (and tamper with) looks like that:
{
  "clientDataJSON": {
    "type": "webauthn.create",
    "challenge": "vjRxbGl-z0mu7aiDSQ8dmOwApD3-diPtTD1c7foFGX2SAfNGeRarVrfs2OhYVHmPB44Ryb130FH1HkWkbghOCA",
    "origin": "https://webauthn.io",
    "crossOrigin": false
  },
  "attestationObject": {
    "attestationStatement": {
      "format": "none"
    },
    "authenticatorData": {
      "rpIdHash": "74A6EA9213C99C2F74B22492B320CF40262A94C1A950A0397F29250B60841EF0",
      "extensions": {},
      "signCount": 1,
      "flags": {
        "userPresent": true,
        "userVerified": true,
        "backupEligible": false,
        "backupState": false,
        "attestedCredentialData": true,
        "extensionDataIncluded": false
      },
      "attestedCredentialData": {
        "aaguid": "01020304-0506-0708-0102-030405060708",
        "coseKey": {
          "keyType": "OKP",
          "algorithm": "EdDSA",
          "curve": "Ed25519",
          "x": "43683A6F441901E3F18EFAA063F9EA3744B4B0AD7A9F9D03C7CFC1CF68599BC7"
        },
        "credentialId": "499372227EED59DE55410AF261C9AD669052CC0DF5A5A18D92AC33FB21D216D3"
      }
    },
    "fmt": "none"
  }
}
This is what Passkey Editor puts in the tab, preventing you assembling it by hand, field by field, for every request you'd like to touch.
After you can decode and re-encode, you want to mess with the values to assess the robustness of the relying party. Then, most if not all the attacks at this layer are quite cheap in principle (e.g., strip the signature, set the UV (user verification) flag to zero, downgrade the algorithms, mess with signCount...), if you don't need to fight with encodings. And, potentially, you need to pay this "tax" on every field, on every request, on every relying party you test.
There's a bunch of checklist-like basic checks that you should perform as the baseline. And apparently, those basic checks pay off more than you'd expect: for example, in State of Passkeys, Jannett et al. tested 103 live relying parties and found all 103 vulnerable to at least one server-side attack, 18 of them critically.
But checklist work expands to fill whatever time you give it, and usually the most severe findings are the ones that don't generalize, the logic flaws sitting in one relying party's specific enrollment or recovery flow and nowhere else. Clearing the groundwork fast, allowing you to dedicate more time to those, was the tool's main job above all the others.
Passkey Editor
Passkey Editor watches for the two ceremony types, webauthn.create for registration and webauthn.get for authentication. When one of them matches, a Passkey Editor tab appears on the request alongside Pretty, Raw and Hex, and it can follow the request into Repeater.
If you've used the JWT Editor, you already know the shape: a dedicated message-editor tab that appears wherever the interesting traffic is, a decoded structured view you edit in place, a dropdown of one-click attacks, and key management behind it. That's the model I drew most of my inspiration from, as it's the workflow Burp users already have muscle memory for.
Under that tab the tool handles both ceremony types, decodes the authenticator data, the attestation object and the COSE (CBOR Object Signing and Encryption) public key for display, and re-signs in eleven COSE algorithms when an edit calls for it.
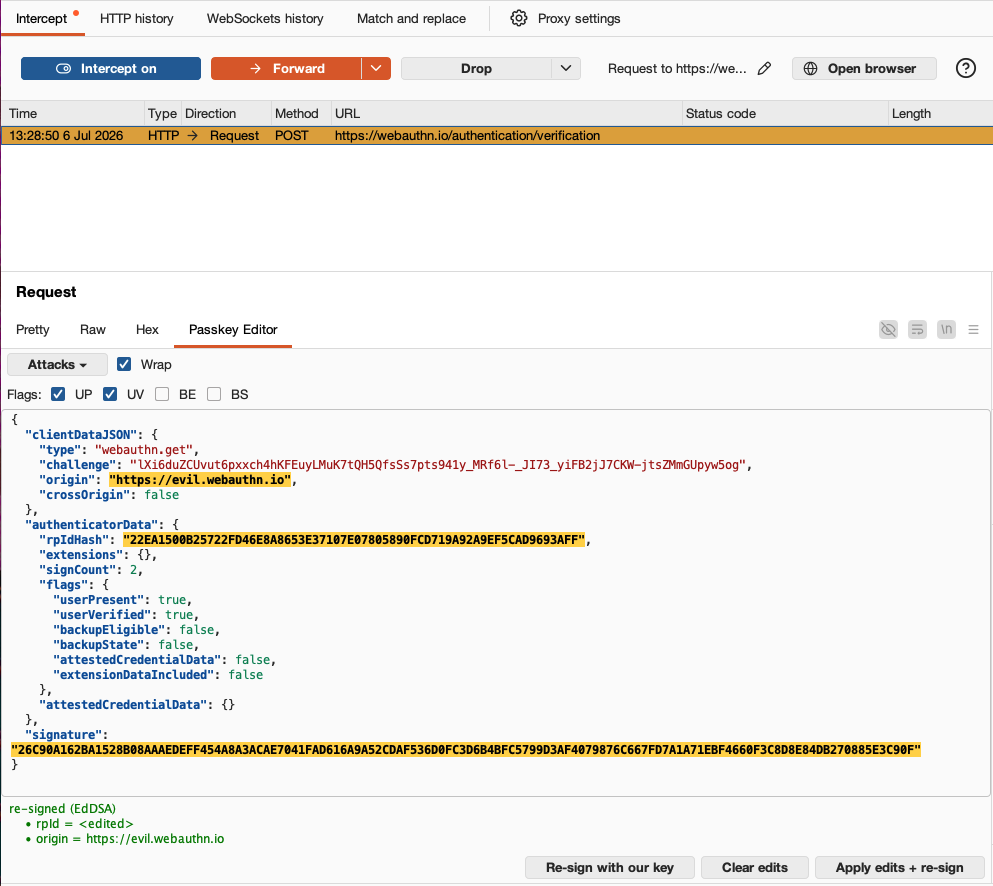
Where the tab shows up determines what it lets you do: on a request that has already gone out, in Proxy history or Scanner, it decodes and stops there, because nothing is left to change. In Repeater and in Proxy intercept, where the request hasn't reached the server yet, the same tab turns editable and the action controls appear: the Attacks dropdown, the flag checkboxes, and the re-sign buttons.
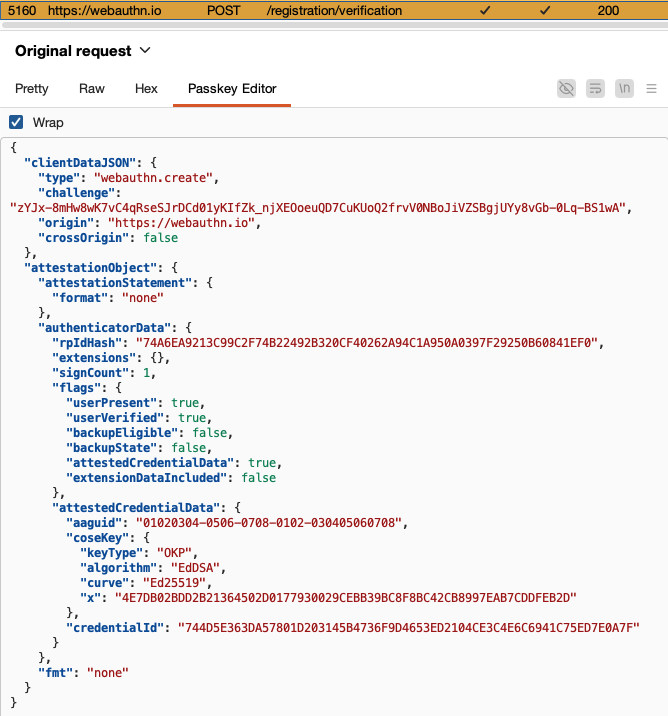
The tool also marks every field you change or have changed in amber: when you forward a tampered request and you find it back in Proxy history, all the fields you touched will be highlighted. Without that, working out what you changed means flipping between the Original and Edited tabs and, on a ceremony this nested, sending both to Comparer for a byte-wise diff. But in that way, edits are kept in sight.
Under the hood
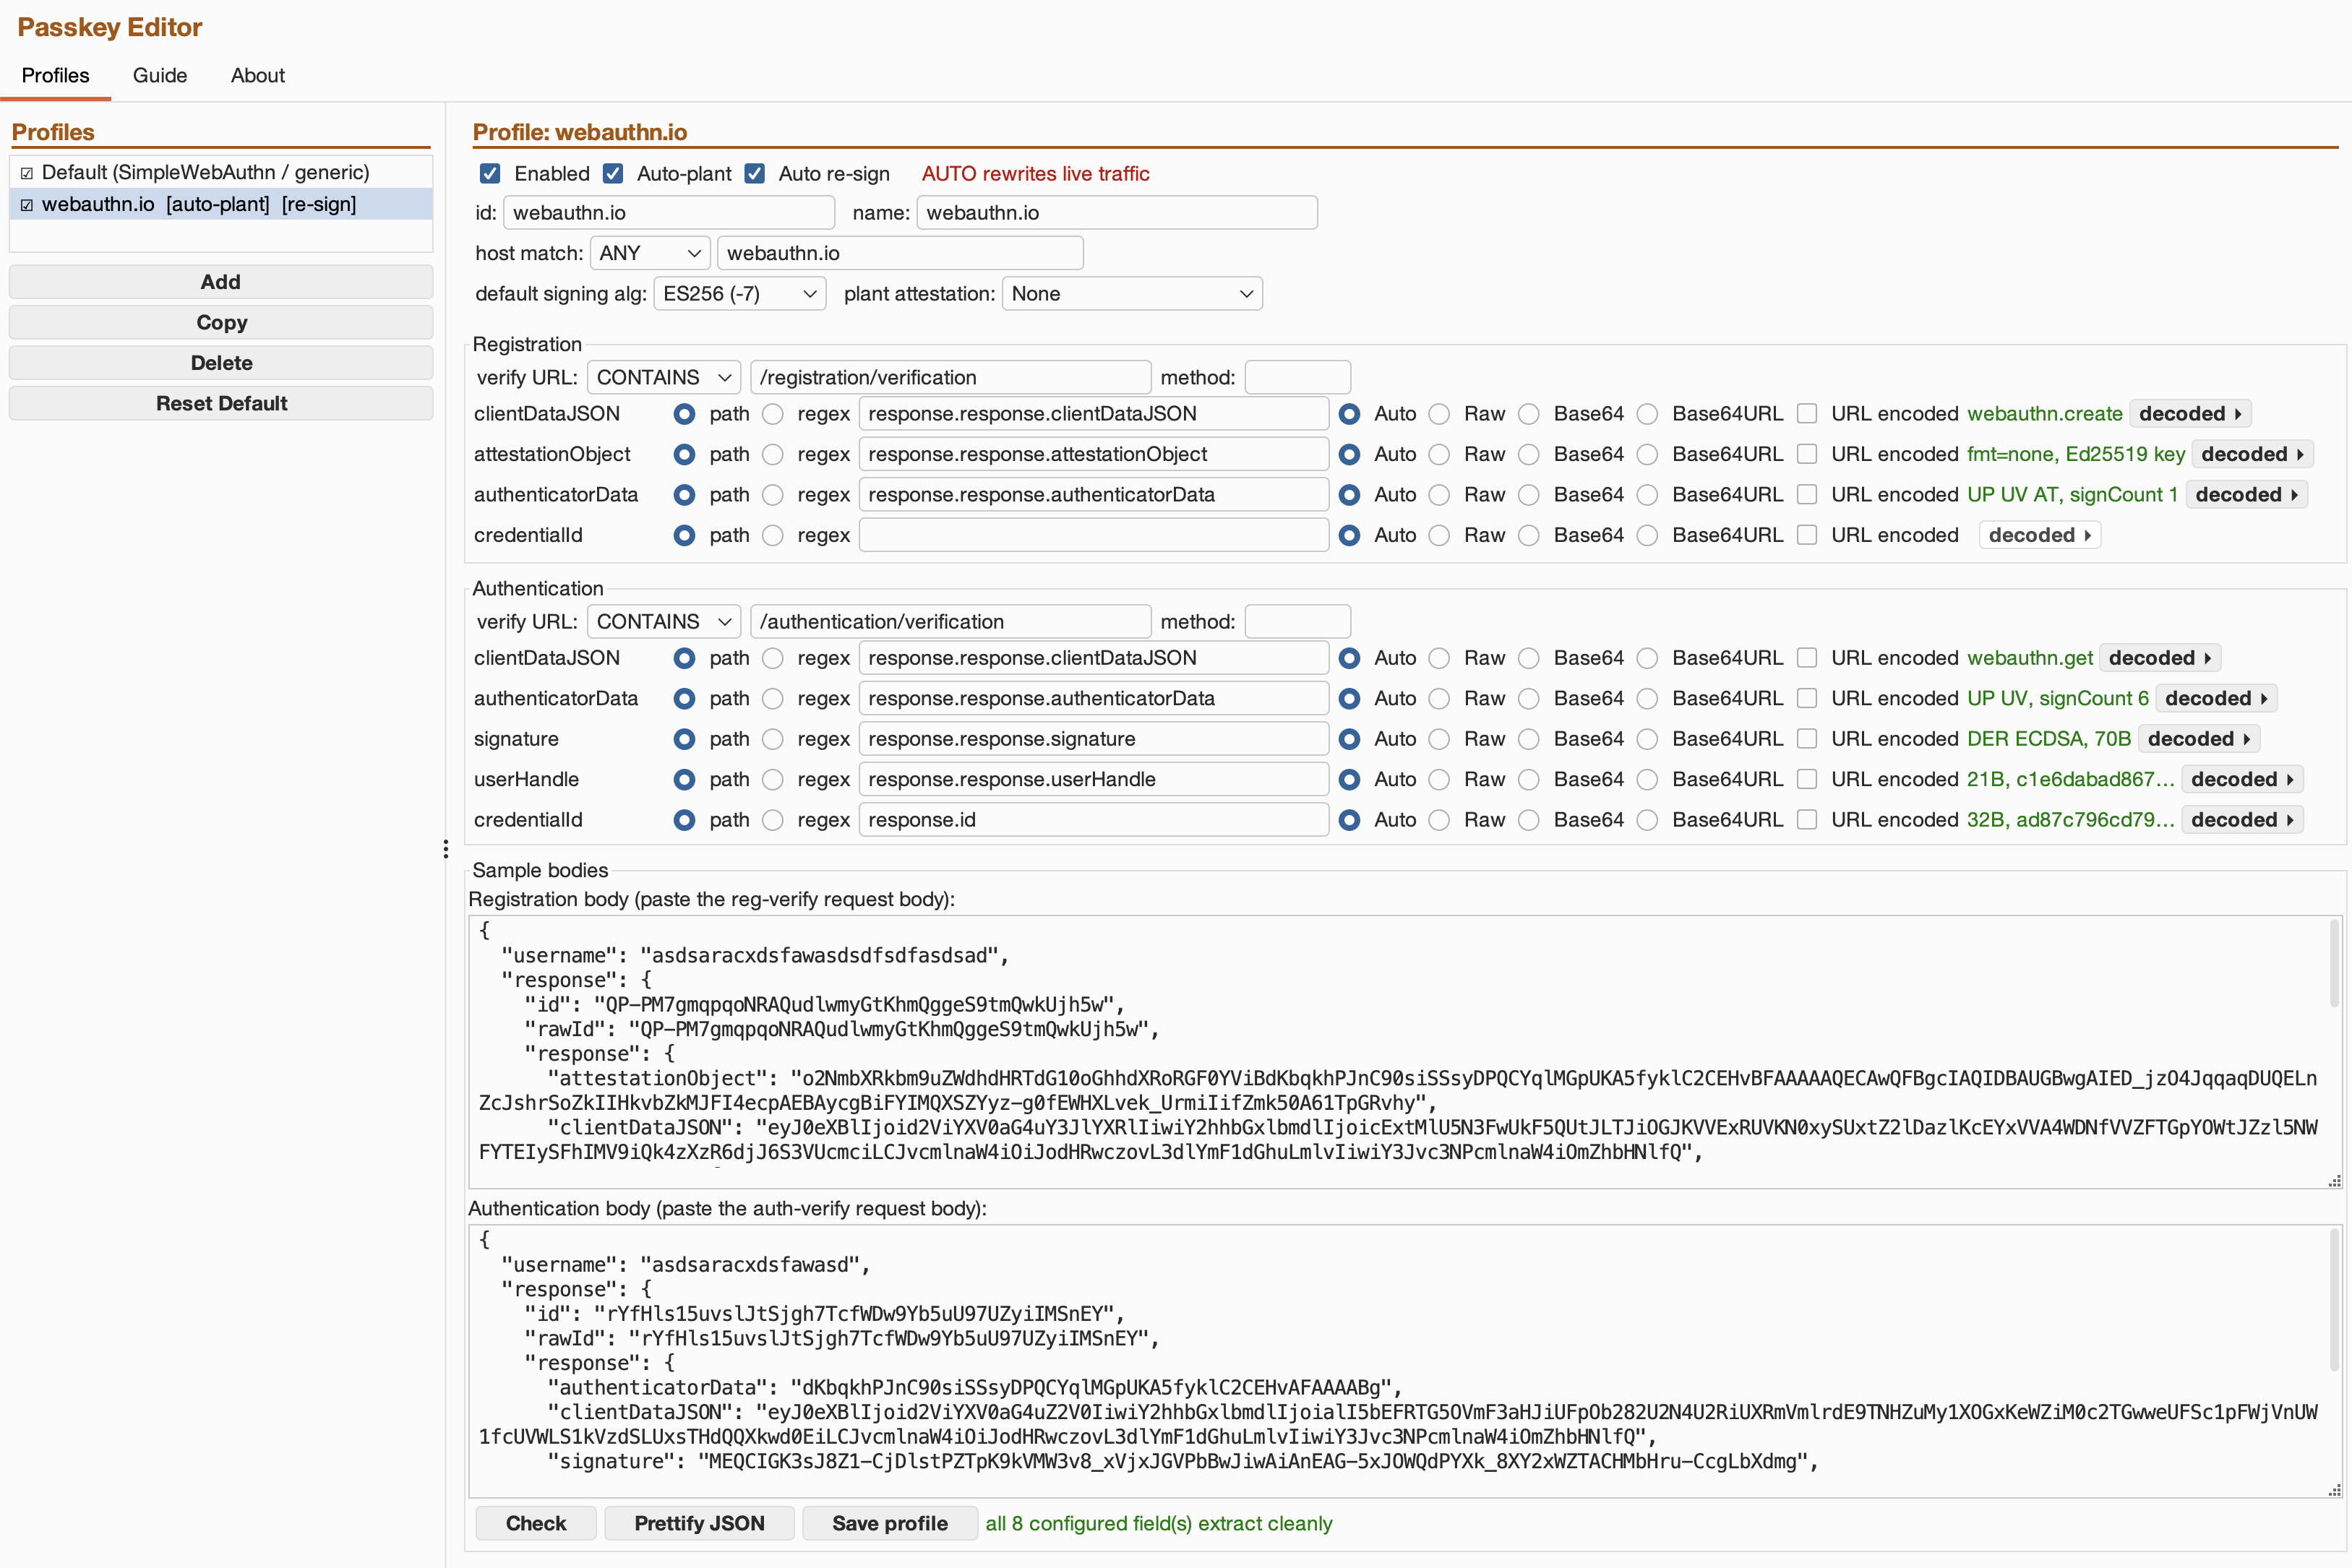
Detection is regex and config driven, backed by a per-host profile. The profile pins the ceremonies' URLs and records where each field lives in that particular relying party's request. The engine carries no vendor-specific branches, so meeting a new deployment means describing it in a profile.
The decode path is a per-layer pipeline: it unwraps each Base64 or JSON layer in turn, remembering the exact flavor and padding of each so it can put them back, then decodes the CBOR and COSE with webauthn4j's low-level converters.
⚠️ A deliberate choice worth flagging. I use webauthn4j's converters and not its validating manager. The manager's whole job is to reject malformed ceremonies, and malformed ceremonies are exactly what this tool exists to produce. Wiring in the validator would have the library refuse the payloads you are trying to build.
The editable view is structured JSON with undo, redo, and a line-wrap toggle. The tool keeps clientDataJSON as opaque bytes and signs the exact wire bytes, never a re-serialization, because the server hashes what arrived, and a re-serialized copy with reordered keys would fail for a reason that has nothing to do with your attack.
However, other data structures are signed by the private key the Authenticator has. To have those values tampered with and accepted by the relying party, we basically stop borrowing the authenticator's key and start using one you own. Sitting between the client and the relying party, the tool plants the COSE public key of a keypair it generated during registration, so what the server files away is a credential you hold the private half of. From then on it can re-sign at will: every later assertion for that credential gets signed with your key, and the server verifies it against the one it stored, happily. The "real" authenticator is out of the loop, and so is the constraint that made the field uneditable.
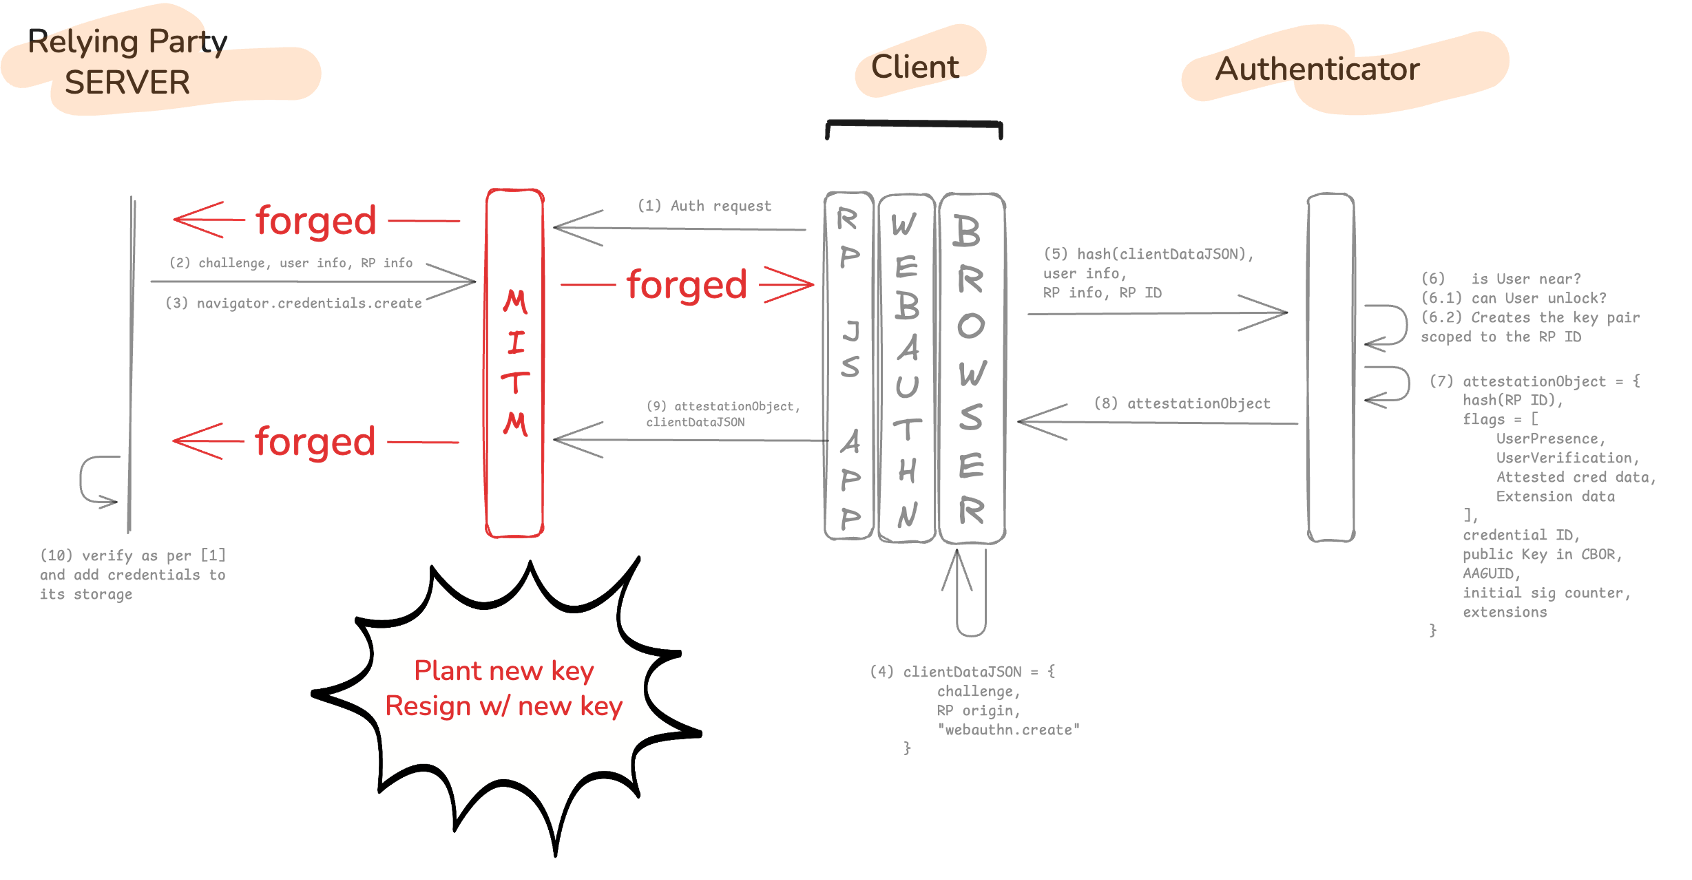
The Attacks dropdown sits next to the editor, and behind it is the re-sign engine. They work in conjunction so that you can configure each attack (or combination of them) without caring about the re-sign process that happens under the hood.
When you plant a key, you also pick what attestation ships with it. Passkey Editor offers two formats, none and packed, and the choice is what decides whether a given relying party takes the credential.
| Attestation | What lands in attestationObject
|
What the RP can actually check | Shipped |
|---|---|---|---|
none |
fmt: "none", empty statement |
Nothing. There is no claim to verify. | yes |
packed, self-attested |
alg and sig over authData, signed by the planted credential key itself, no x5c, all-zero AAGUID (Authenticator Attestation GUID, the model identifier) |
That the statement is internally consistent. Not who built the authenticator. | yes |
packed, full |
alg, sig and an x5c chain rooted in a real vendor CA (certificate authority) |
The chain, against a trusted root or the FIDO metadata service | no, by design |
The first two cover the deployments worth testing: a server that asks for no attestation at all, and a server that demands a statement but never pins it to a trusted root, which is a very common configuration. The third one the tool deliberately does not attempt: producing a chain that validates against a vendor CA you don't control is precisely what full attestation exists to prevent. So, a server checking it properly will refuse the other two as well. As you can easily guess, that is the control working (not a gap in the tool), and indeed, it was a design decision.
That re-sign engine has to speak whatever algorithm the relying party picked, so it carries eleven of them, across the ECDSA, RSA-PKCS1, RSA-PSS and EdDSA families. Each signature goes out in that algorithm's correct wire form rather than assuming everything is ECDSA in DER (Distinguished Encoding Rules) form, which is the detail that makes an EdDSA target work at all.
Driving all of this manually gets tedious as soon as you start iterating on the same ceremony, which is what AUTO mode is for. Arm it for a profile and the tool re-signs or re-plants in flight across Proxy and Repeater, so a captured ceremony keeps validating as you resend and tweak it. It's off by default, and arming is the only opt-in: AUTO acts on whatever the profile's host rule covers, in or out of Burp's target scope.
Scanner, Intruder and the recorded-login replayer are excluded on purpose, since they re-issue requests on their own schedule and an in-flight plant would register a fresh key on the account every time, invalidating other parallel workflows. Also, a manual edit always wins over AUTO mode, so a ceremony you hand-forged in the tab is the one that goes out independently of whether AUTO is on or off.
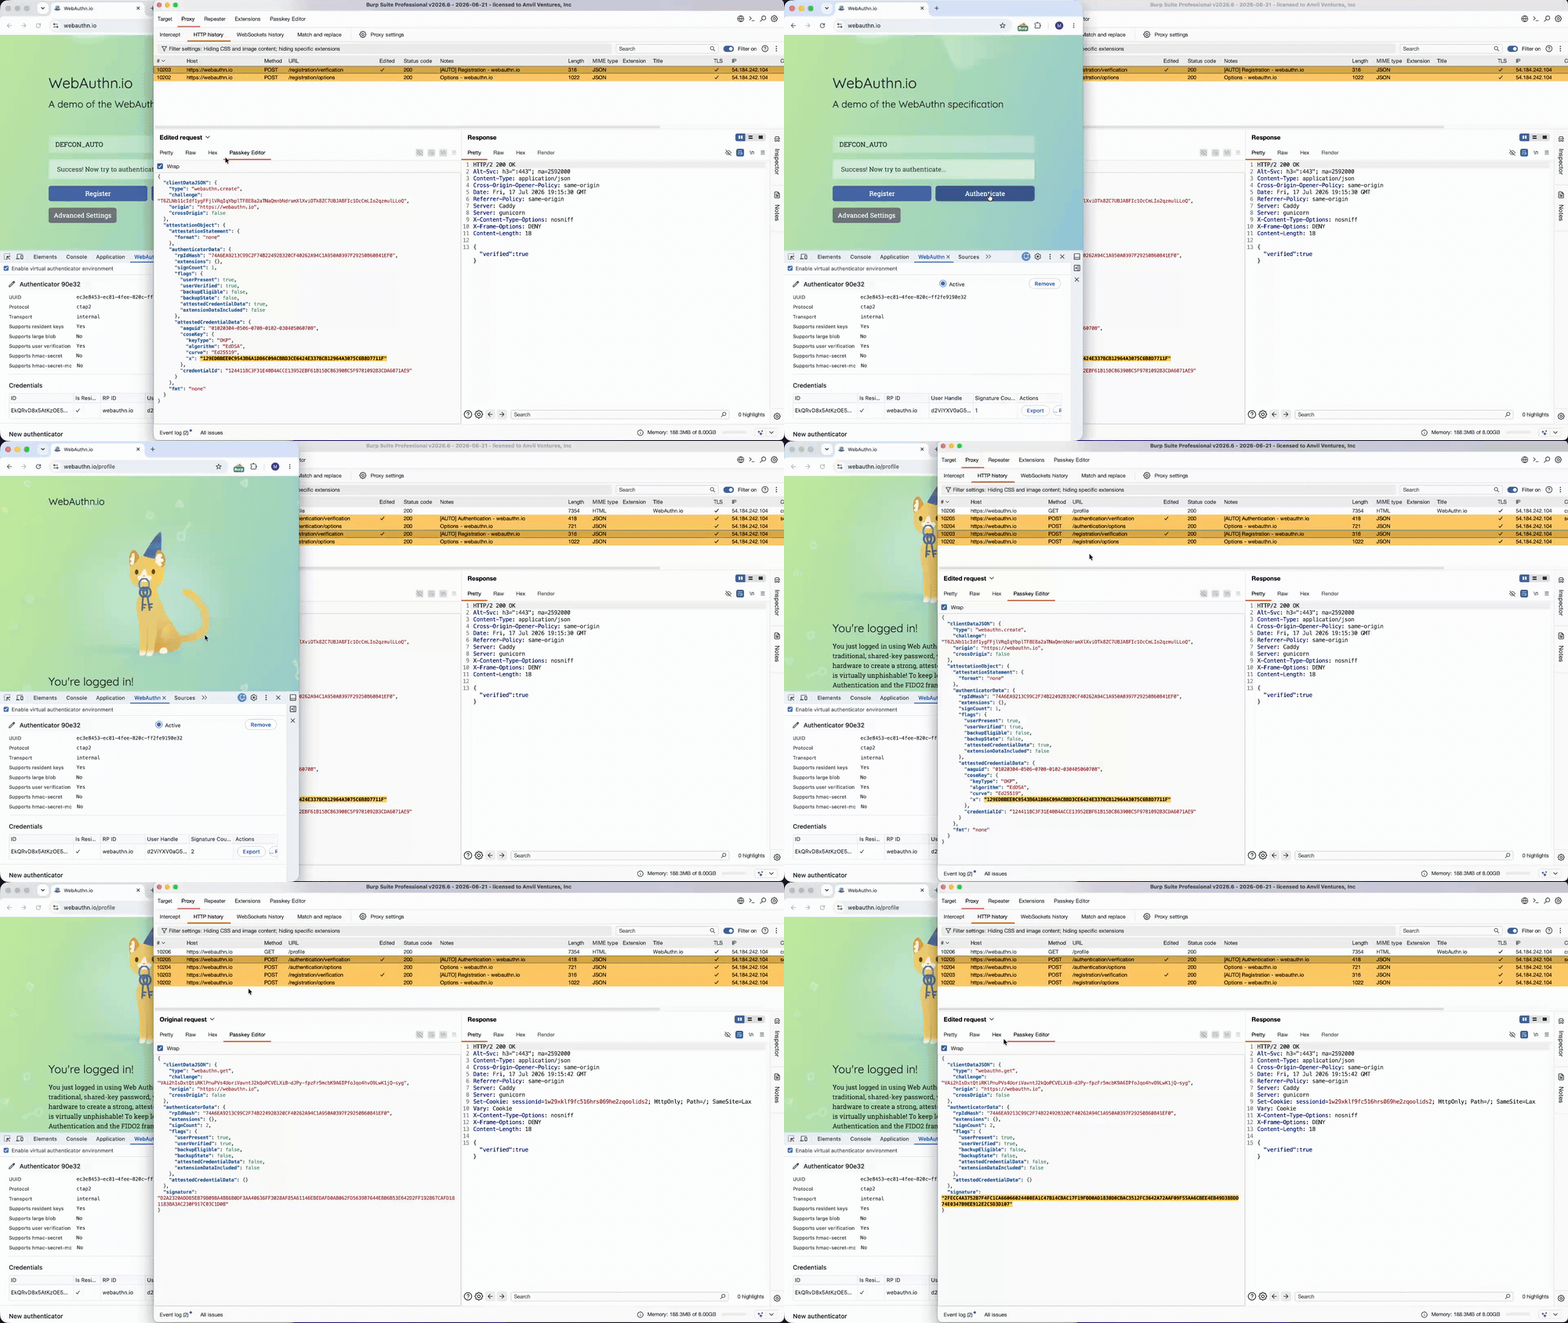
An unedited ceremony forwards byte-for-byte identical, and the tool never touches traffic you didn't tell it to change. If you ask me, I wouldn't deal with a decoder that quietly rewrites bytes making my requests to be rejected for unknown reasons. I'd immediately stop trusting this tool. That is why Passkey Editor was designed to be invisible on the wire until you ask it not to be.
Working demos
Just to give an idea of some of the enabled workflows, you can see some examples of recorded demos against two relying parties: webauthn.io and github.com.
Everything shown in the videos is just for the sake of demonstrating Passkey Editor's capabilities. There is no victim here, and no account takeover. The point is just to show how Passkey Editor can build whatever ceremony you want and have a real relying party evaluate it.
After you created a dedicated profile for a given relying party, a standard interception flow could go either full manual, within the Interceptor, or full automatic, enabling the AUTO flags.
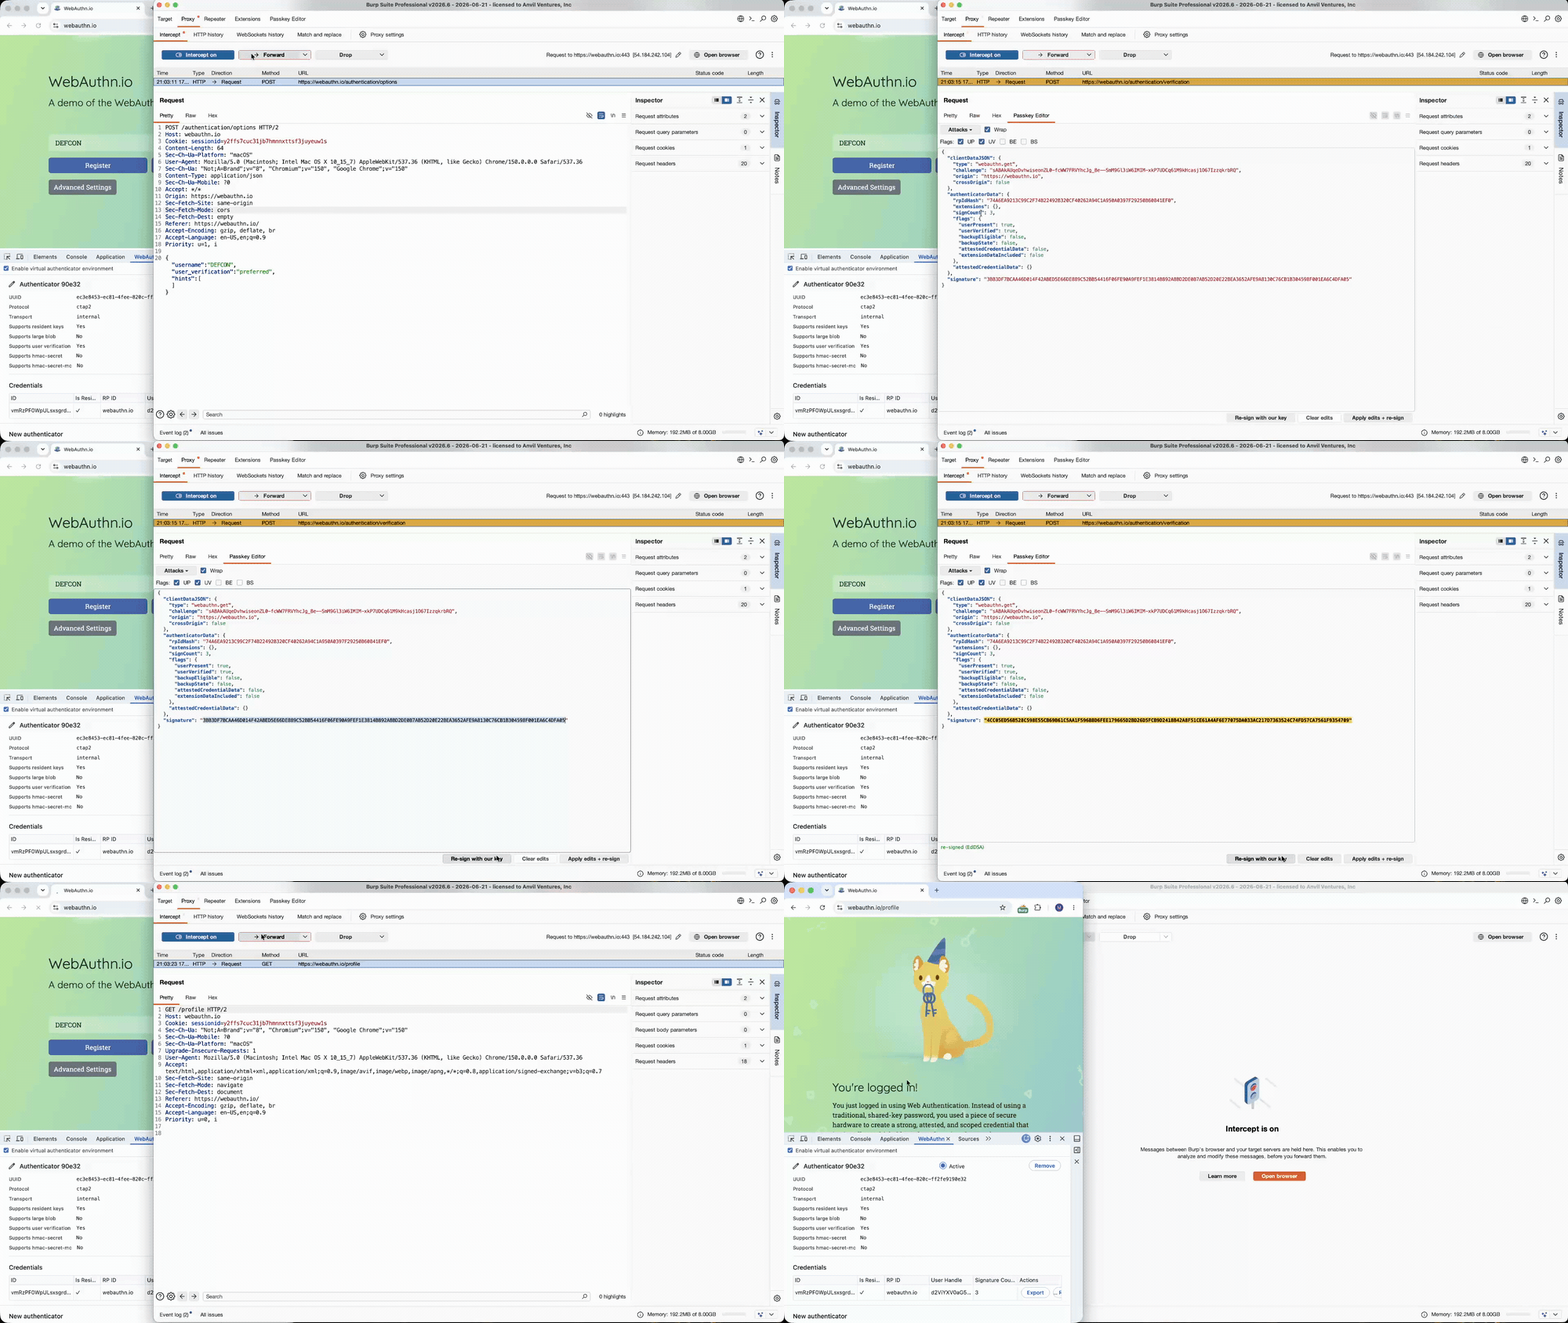
In the following full video you can see a full manual flow, from key planting at registration time (as fmt="none") to re-signing with it during authentication assertions.
Full demo: forge-manual.mp4
The same flow, with AUTO flags enabled:
Full demo: forge-auto.mp4
After plant+re-sign is validated, you can proceed with checks and attacks exactly in the same way as before, either using the one-click dropdown options, or manually editing the JSON for full flexibility.
You can manually force a re-sign after edits are made, or the tool will do so automatically for you.
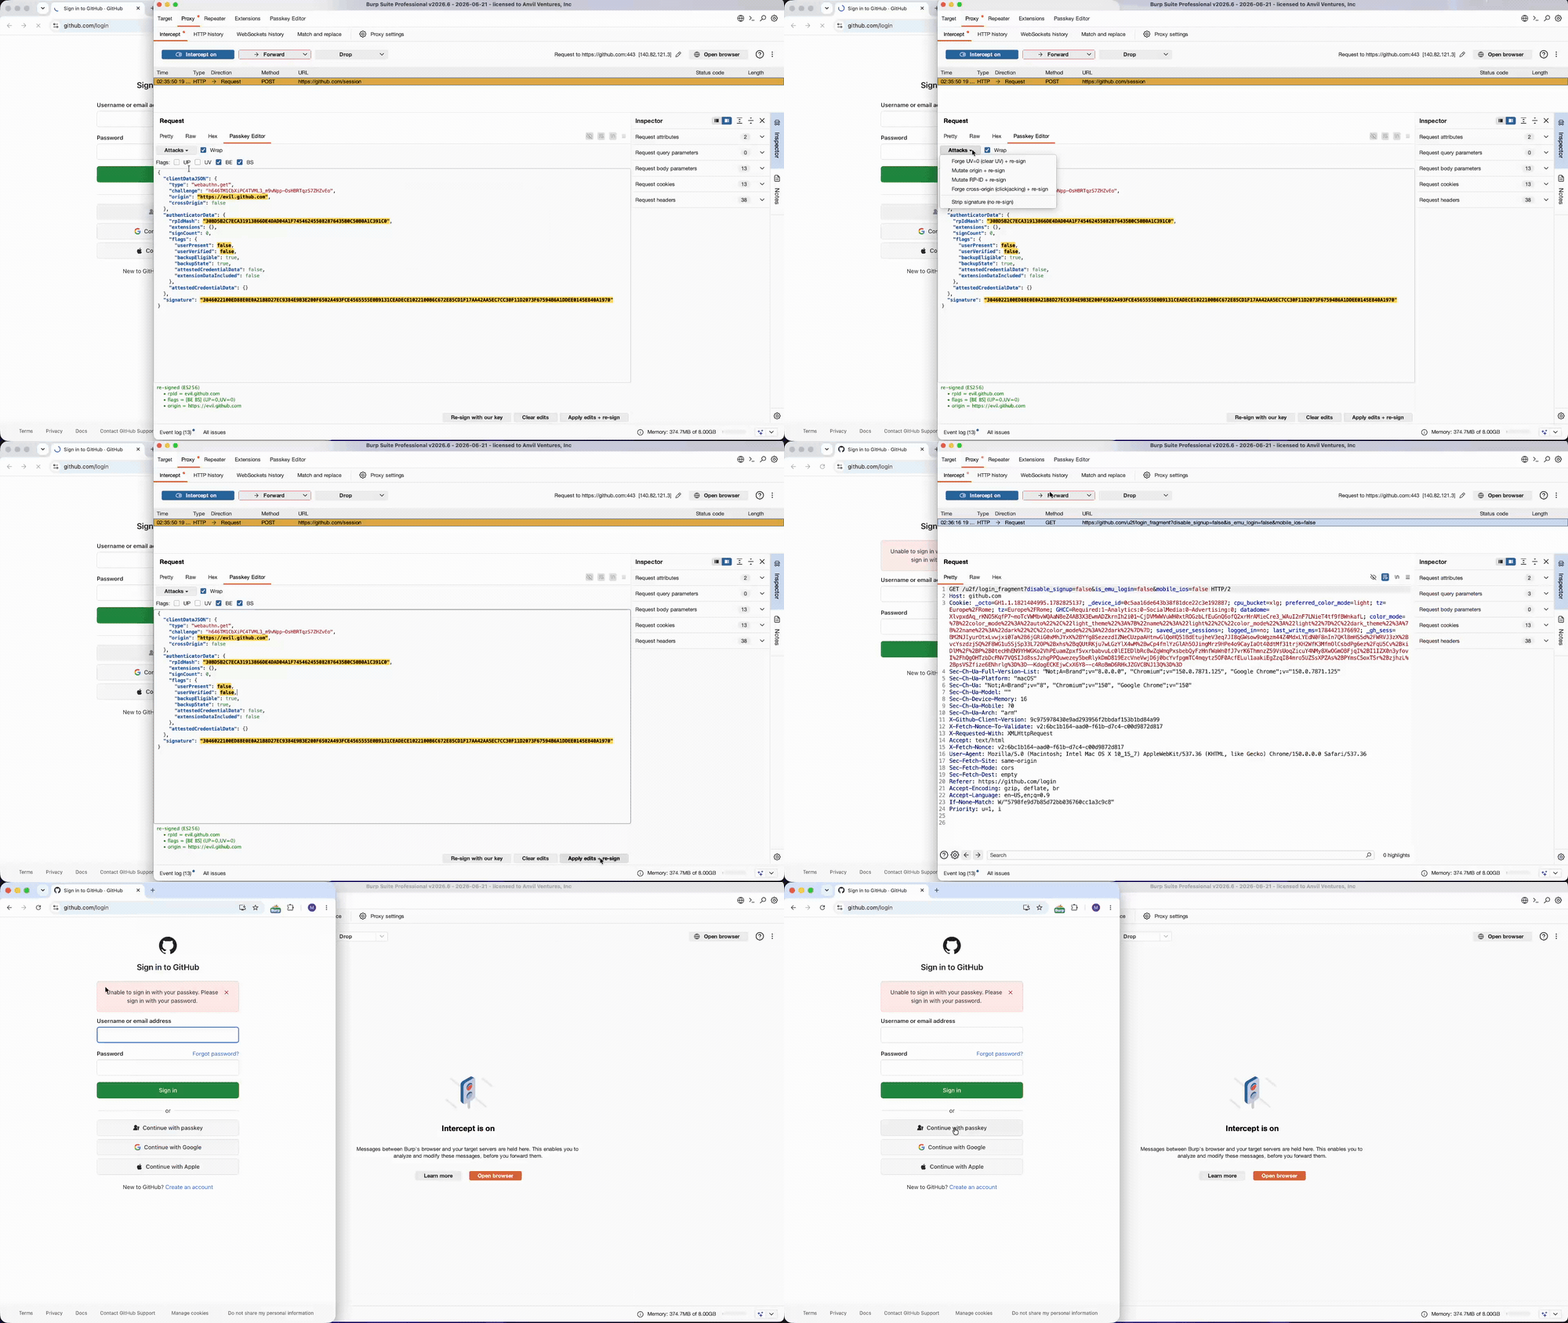
Full demos: framing-1.mp4, framing-2.mp4, framing-3.mp4
The attacks
The Attacks dropdown puts the checks you run on every passkey engagement one click away:
| Attack | Ceremony | What it does |
|---|---|---|
| Signature invalidation | Authentication | Degrades the assertion signature four ways. Flip trailing byte keeps it well-formed for a clean verification failure. Empty, zeroed and random bytes go further: against ECDSA none of those are valid DER, so a parse-then-verify server throws on decode before the signature check. |
| UV bypass | Both | Two routes. In the ceremony, clear the UV flag in authData and re-sign. In the options response, downgrade userVerification to discouraged, so the authenticator legitimately returns UV=0. The second catches a relying party that sends a policy it never re-checks. |
| Origin / RP-ID mutation | Authentication | Rewrites origin or the RP-ID hash and re-signs, to probe how strictly the server binds a ceremony to its domain. |
| Cross-origin forge | Authentication | Sets crossOrigin=true with an attacker topOrigin, leaves origin intact, and re-signs. Finds relying parties that skip the framing check (CWE-1021). |
| Flag toggles | Both | Flip any combination of the UP (user presence), UV (user verification), BE (backup eligibility) and BS (backup state) flags. Assertions are re-signed; registrations re-encoded as fmt=none. |
| Assertion forgery | Authentication | Re-signs the assertion with a key the tool controls. Succeeds once the relying party has stored a substituted key. |
| Registration key substitution | Registration | Swaps the credential public key for one the tool holds (fmt=none or packed self-attestation), so the relying party stores the attacker's key. |
| credentialId swap | Registration | Replaces the credentialId to probe collision and overwrite handling. |
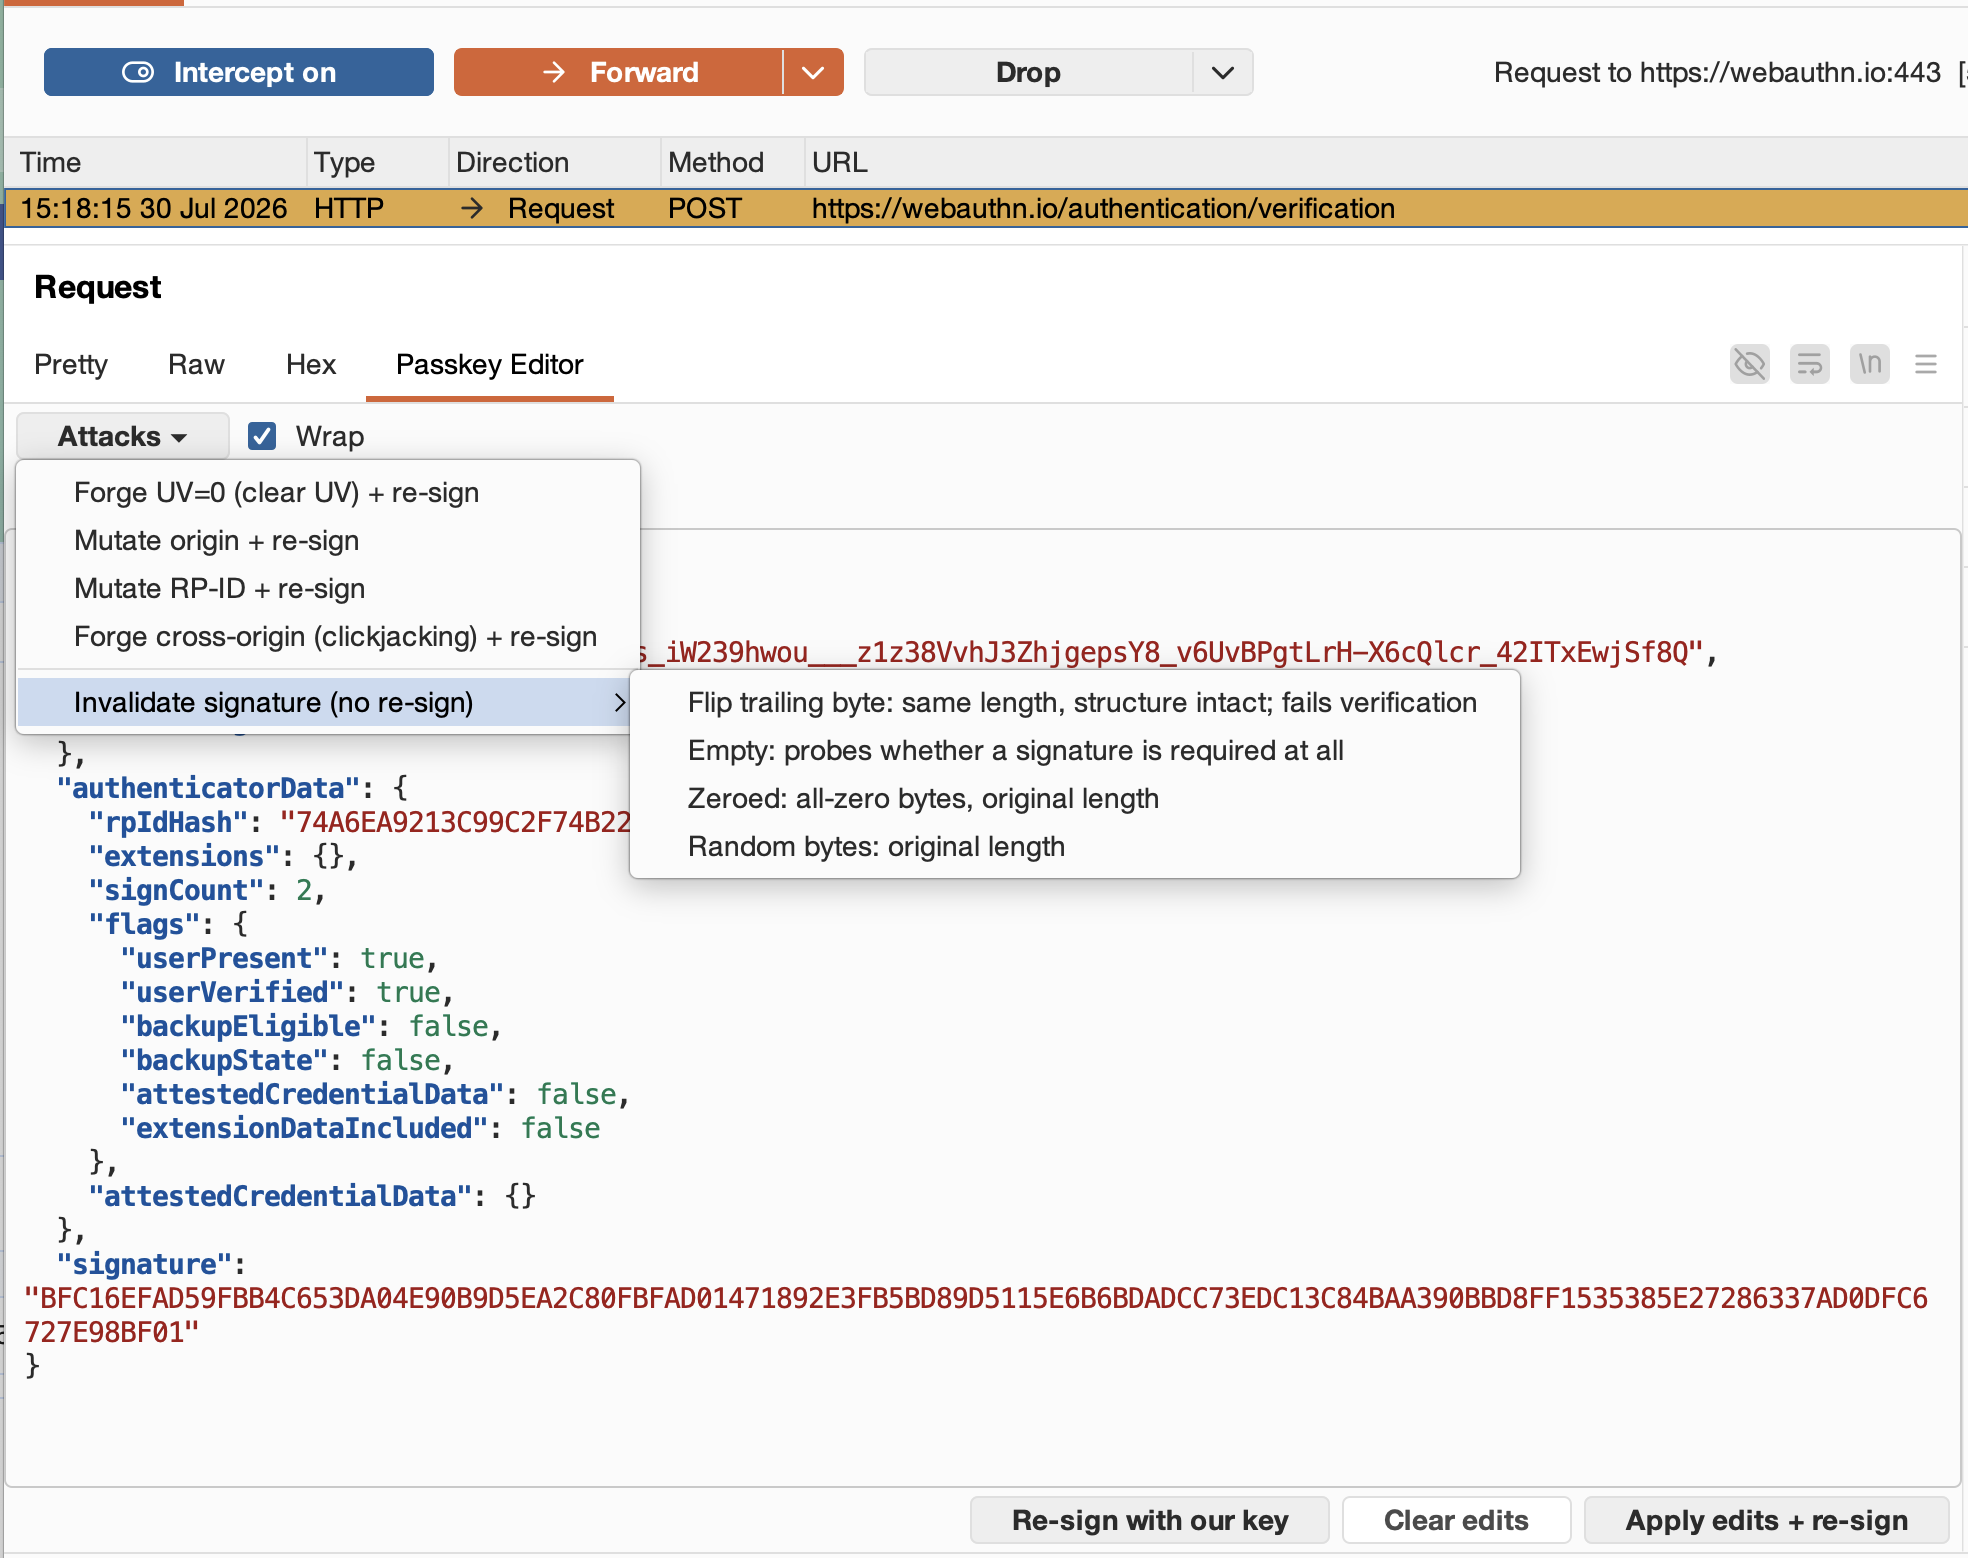
The presets are shortcuts, not limits, and according to priority and relevance, new ones will be supported soon. However, the limit is often the creativity, unleashed by the manual edit possibility.
Then, re-signing covers 11 COSE algorithms, a superset of what common WebAuthn stacks negotiate. All use pure JDK crypto (SunEC, SunRsaSign, Ed25519), with no BouncyCastle or other external provider.
| Algorithm | COSE ID | Family |
|---|---|---|
| ES256 | -7 | ECDSA, P-256 |
| ES384 | -35 | ECDSA, P-384 |
| ES512 | -36 | ECDSA, P-521 |
| EdDSA | -8 | Ed25519 |
| RS256 | -257 | RSASSA-PKCS1-v1_5 |
| RS384 | -258 | RSASSA-PKCS1-v1_5 |
| RS512 | -259 | RSASSA-PKCS1-v1_5 |
| RS1 | -65535 | RSASSA-PKCS1-v1_5 (SHA-1) |
| PS256 | -37 | RSASSA-PSS |
| PS384 | -38 | RSASSA-PSS |
| PS512 | -39 | RSASSA-PSS |
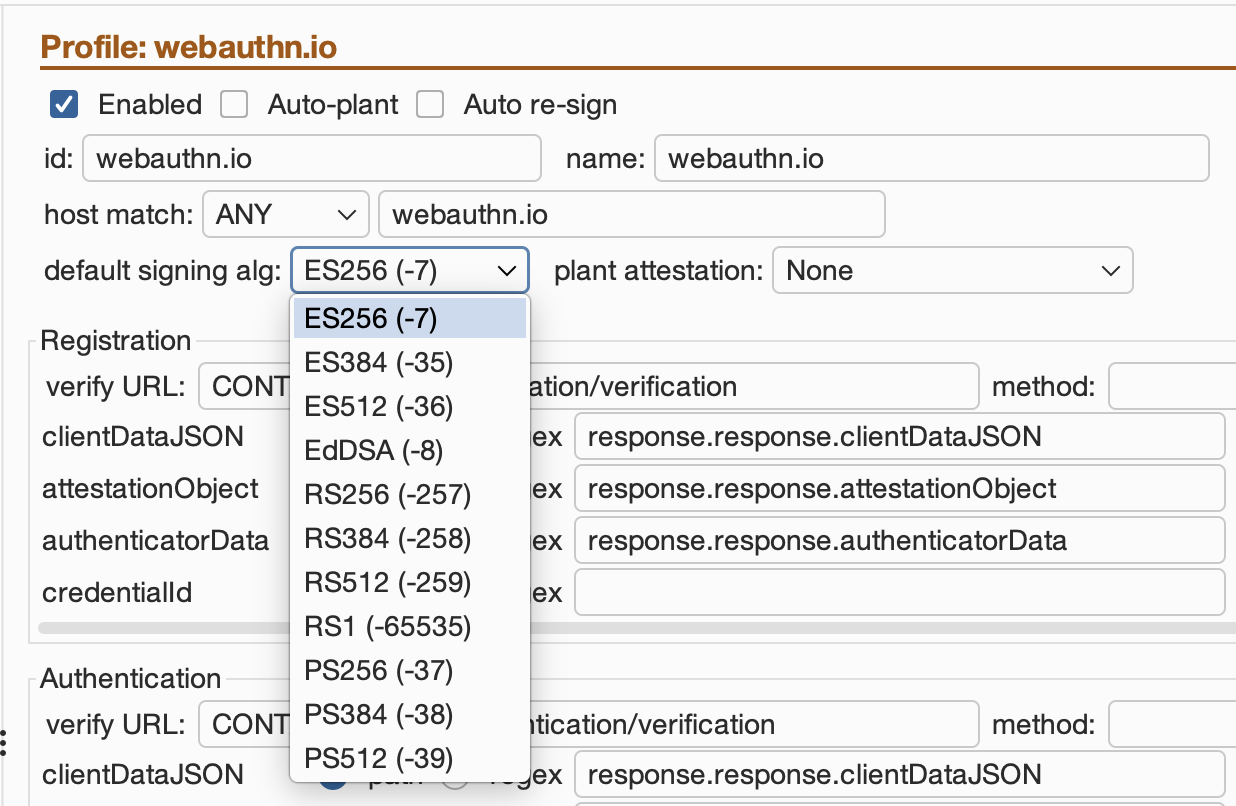
Ideally, all of that serves a dual purpose: helping cover the basics - that more often than not are relavant from an impact perspective - rather quickly, but also allowing to easily concentrate with more advanced, nuanced, and ad-hoc RP-by-RP business logic use cases.
Those surroundings, along with the attack classes these presets probe, are the subject of Part 3 of the series (forthcoming), which lays out what survives a cryptographically correct ceremony.
Where this sits next to the rest
I wasn't the first to take a run at this problem. Passkey-Raider comes closest on decoding, with regex detection, an editable tab, and a key plant that re-signs across eight COSE algorithms, but it packages none of that into attacks, so you drive every tamper by hand. Burp_FIDO2, out of Chen's thesis at UTwente, has the broadest attack coverage of the Burp extensions and struggles the moment a target uses a custom encoding. Outside Burp, Passkeys.Tools, from the group behind the State of Passkeys audit, emulates the browser and the authenticator both, which buys it the widest tampering surface of anything here and costs it the one thing a Burp extension gets for free: it doesn't live where you're already working.
| Tool | Decode | Re-encode | Attack presets | Re-sign | In Burp |
|---|---|---|---|---|---|
| webauthn-cbor | ~ | no | no | no | yes |
| Passkey-Scanner | yes | no | passive only | no | yes |
| Passkey-Raider | yes | yes | no | 8 algorithms | yes |
| Burp_FIDO2 | ~ | ~ | yes | yes | yes |
| Passkeys.Tools | yes | yes | yes | yes | no |
| Passkey Editor | yes | yes | yes | 11 algorithms | yes |
~ means partial: webauthn-cbor decodes a subset of the structure, and Burp_FIDO2's decode and re-encode both break on unusual wrappers. The decode, re-encode and passive-testing columns for the first three rows follow Jannett et al.'s own capability survey in State of Passkeys.
The gap is widely felt, though. Passkey tooling keeps landing at security conferences, Grafnetter's Pass-the-Passkey at Black Hat 2026 USA among them, and this one on the DEF CON 34 Main Stage.
Roadmap
A few things are on the list, in rough order:
- Faster target setup. Right-click a captured ceremony to seed a profile, then point at a field in the body and let the tool work out its path and encoding, the way you mark a payload position in Intruder. And profile editing from where you already are, so setting up a new relying party stops being a round trip between the Proxy tab and the editor tab.
- Keys for more than one account at a time. The store currently keys on the credential, so two accounts on the same relying party step on each other. Fixing that opens up the cross-account cases.
- A faithful challenge-replay attack, which automates response-side capture of an unconsumed challenge to be later used.
- More presets in order of relevance and impact, as named recipes.
- A passive scanner capability that flags ceremonies and common misconfigurations as they go by.
Conclusion
The through-line of the whole series is that the passkey ceremony itself is sound. You shouldn't spend an engagement attacking the cryptography, because the FIDO Alliance and the W3C already spent years doing that for you. The bugs are in the surroundings, and most of them lie in what the relying party does or doesn't check. Passkey Editor is a tool that lets you get at that surface at engagement speed, instead of losing the first day to Base64 and CBOR.
Passkey Editor had its first public outing at DEF CON 34, where I walked through some of the attack classes these presets automate. For more details, you can refer to the GitHub repository itself.
If you want the theory behind the attacks, the series is The Protocol, The Architecture and Under Attack (coming soon).
About the Author
 Matteo Giordano is an Italy-based offensive security specialist and Security Engineer at Anvil Secure, focused on application penetration testing and offensive research, with a growing focus on AI security and AI red teaming. He came into security from kernel-side development at rev.ng Labs, where he worked on a next-generation decompiler. While researching at the intersection of AI and security, on the sidelines, for the past year, he has also researched WebAuthn and passkeys from an attacker’s perspective, mapping the real-world attack surface that sits around the protocol’s cryptographic core.