
By Anatolii Shatylo
TL;DR
This post covers the core steps needed to decrypt and re-sign iOS apps so they can be tested in a non-jailbroken (jailed) environment. We'll also introduce IPAAutoDec, Anvil's CLI tool that automates remote decryption over SSH using a jailbroken device, removing most of the usual setup hassle. Finally, we'll look at how dynamic analysis tools can be used effectively within the jailed setup.
Introduction
Today, more than 80% of all digital time online is spent in mobile apps rather than on the web. With the Apple App Store hosting roughly 1.9 million live apps, iOS applications represent a massive portion of that usage. Despite that scale, adoption of formal mobile application security testing remains uneven. Industry reports indicate that only a small to moderate percentage of apps undergo regular security assessments, and surveys suggest that a significant portion of mobile apps are never formally tested at all. The resulting gap between widespread deployment and limited testing makes iOS applications an attractive target for researchers and attackers alike, since high-impact vulnerabilities may remain undiscovered long after release.
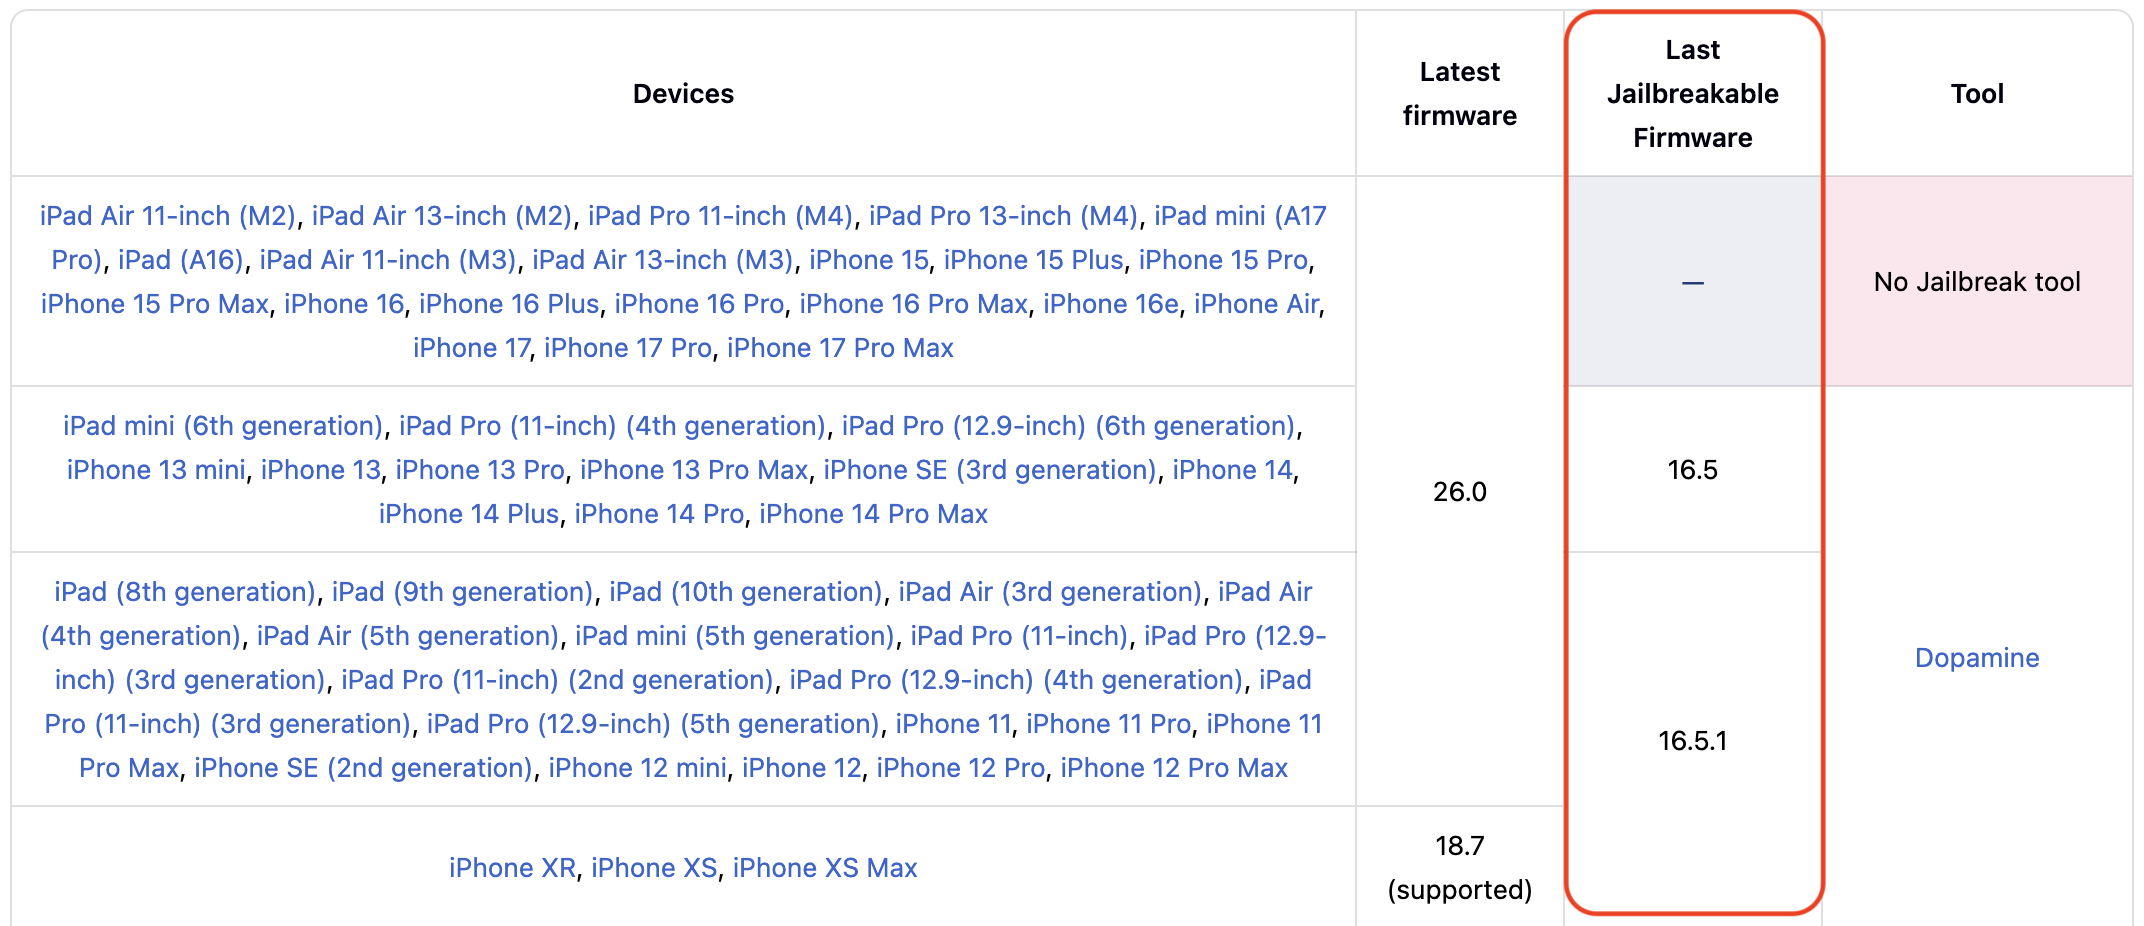
Assessing the security of iOS applications was always challenging due to Apple's strict platform protections, including code signing, sandboxing, entitlements, and a tightly controlled runtime. Historically, researchers relied on jailbreaking as a pragmatic way to bypass those protections and gain deeper visibility into app internals. Modern apps add another layer of complexity: they target the latest iOS releases (which rarely have stable jailbreaks), and many no longer support older firmware that could be jailbroken.
Jailbroken devices are still used during assessments today, but there is a growing sense that with each app update, the minimum supported iOS version will eventually be higher than what can be jailbroken, making this approach increasingly impractical. For example, it is common to see apps with a minimum iOS version set to iOS 15 or 16, while the latest iOS release that currently has a stable jailbreak is iOS 16.7.X (latest versions for iPhone X).
Below are some examples of modern apps and their minimum supported iOS versions:
-
Netflix: The app now requires iOS 16 or later, discontinuing support for devices which cannot be upgraded to iOS 17.
-
WhatsApp: Starting May 5, 2024, WhatsApp no longer supports devices running iOS versions earlier than 15.1.
-
YouTube: The app now requires iOS 16 or later, meaning devices like iPhone 7 and iPhone 7 Plus will no longer be compatible with the app.
This gap illustrates how soon new app updates may no longer run on devices that can be jailbroken, reducing the long-term feasibility of jailbreak-based testing. As a result, understanding how to assess apps on non-jailbroken (jailed) devices is becoming essential for maintaining relevant and sustainable security testing practices.
Core Concept
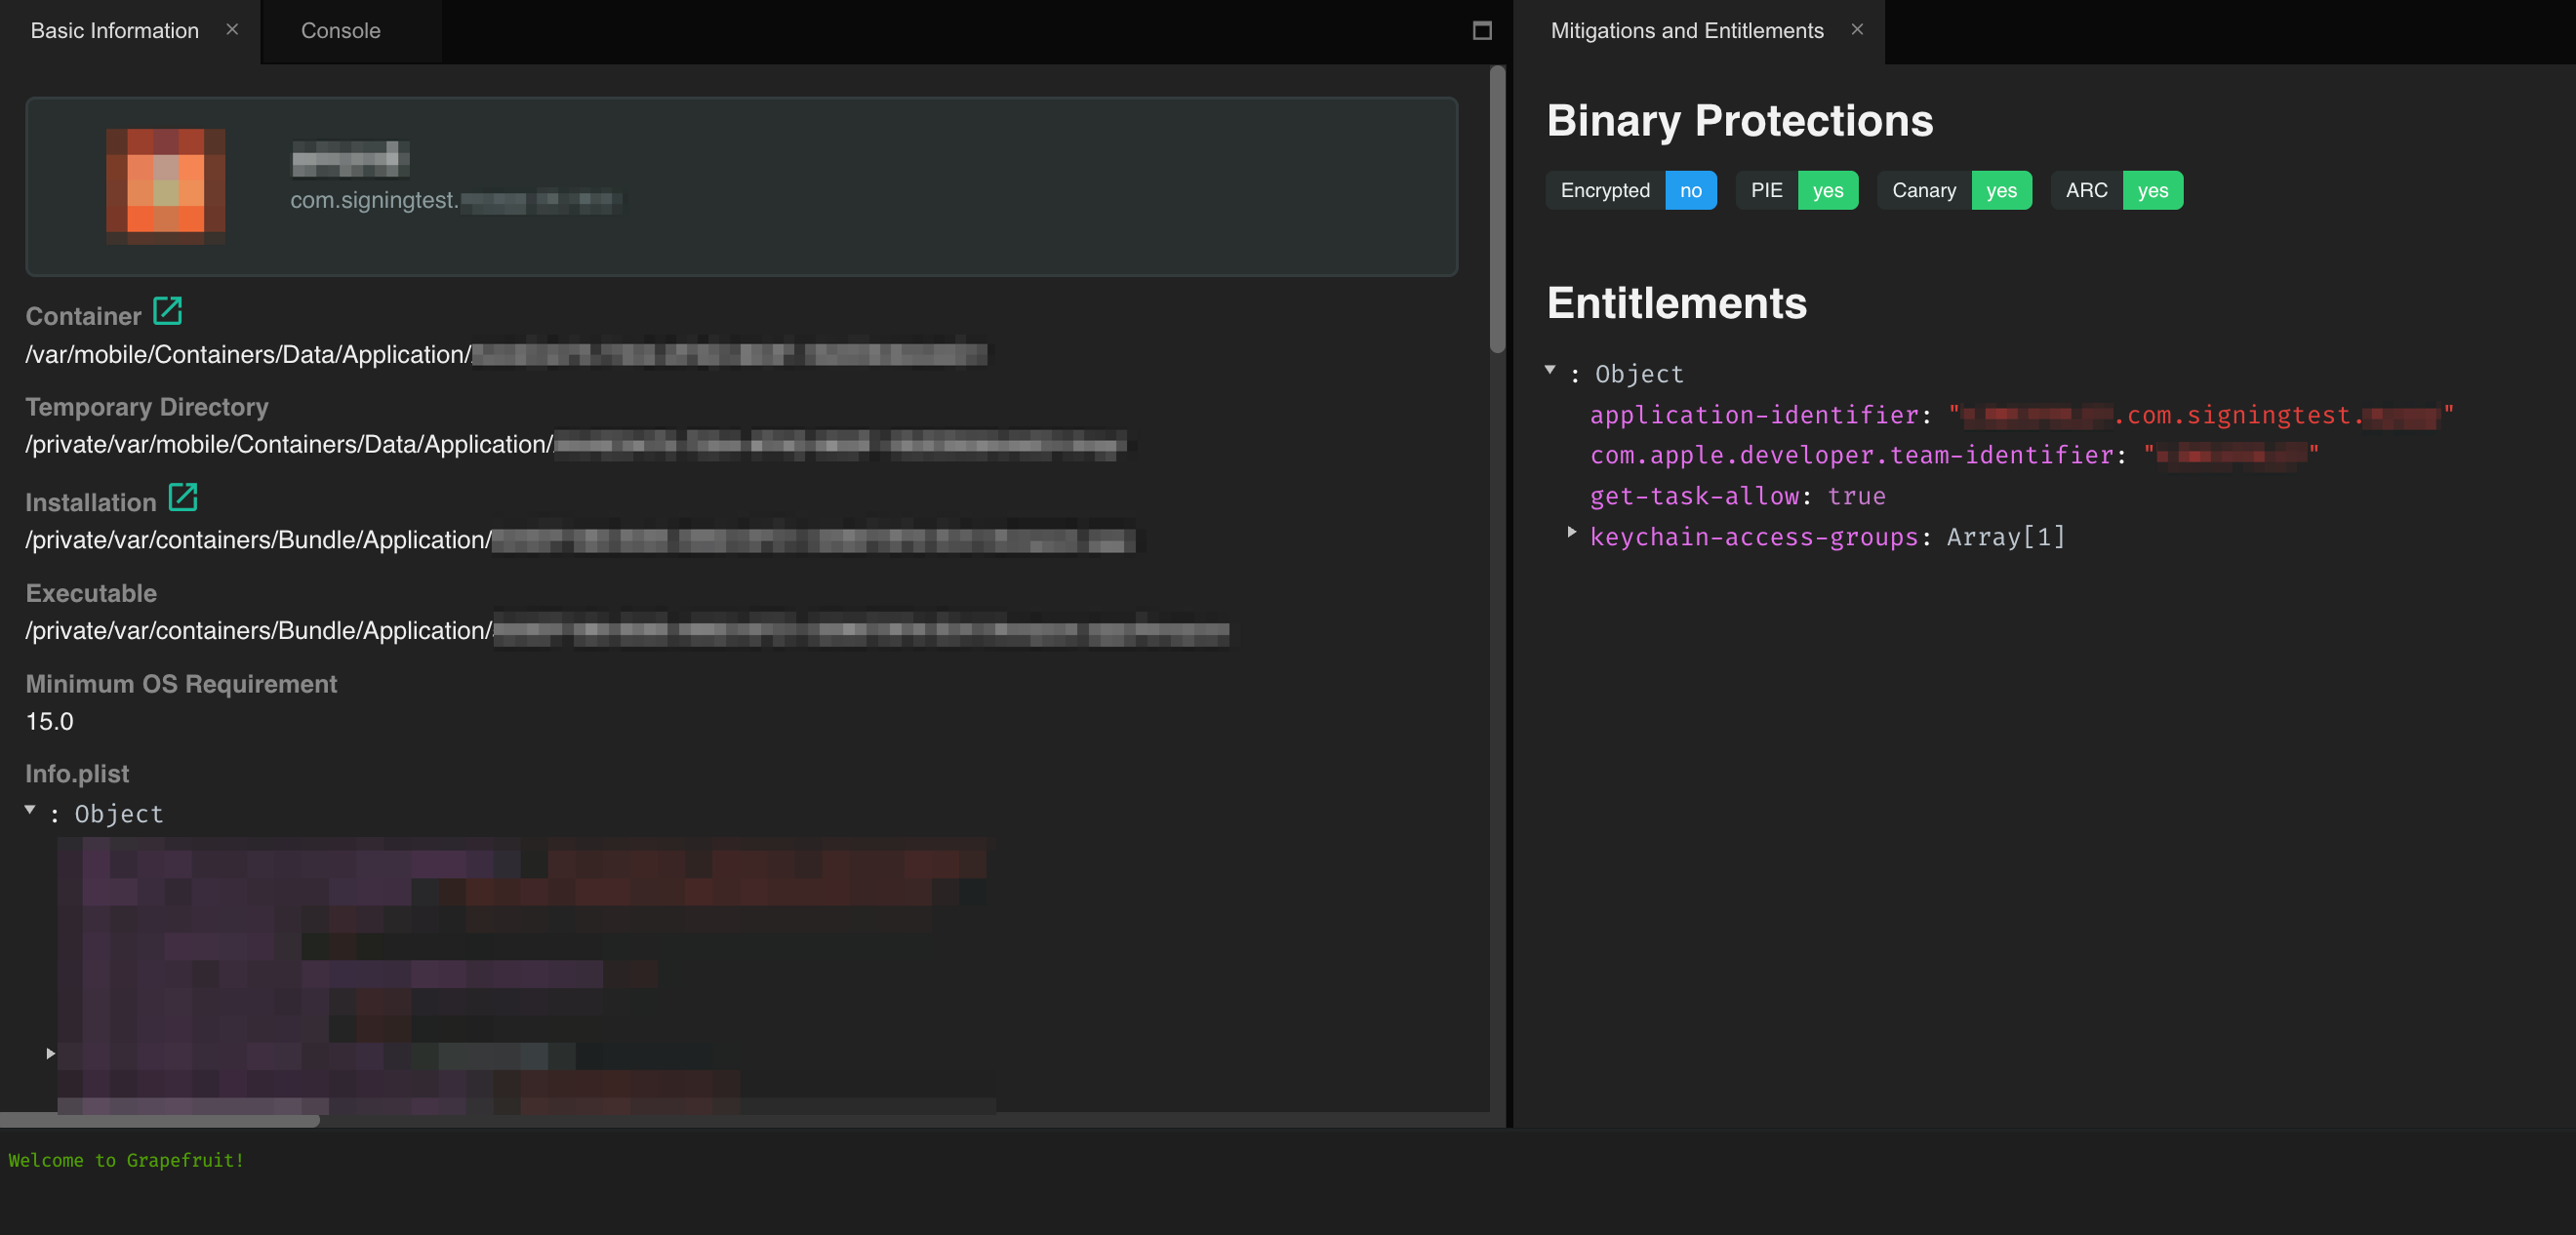
Performing penetration tests in a jailed environment requires balancing two competing realities: Apple's platform protections are strict, and modern apps are often built for iOS versions that cannot be jailbroken. One way to address this challenge is to re-sign the IPA with a development-style entitlement permitting debugger or inspector attachment. That entitlement is called get-task-allow.
The entitlement has been part of iOS since the App Store first launched in 2008, introduced alongside the provisioning and code-signing system. Its purpose was simple but critical: let developers attach debuggers to their apps during development, but prevent the same access once the app is distributed to end users via the App Store. Nowadays, security researchers rely on this mechanism to enable controlled runtime inspection of the apps using tools like Frida and LLDB.
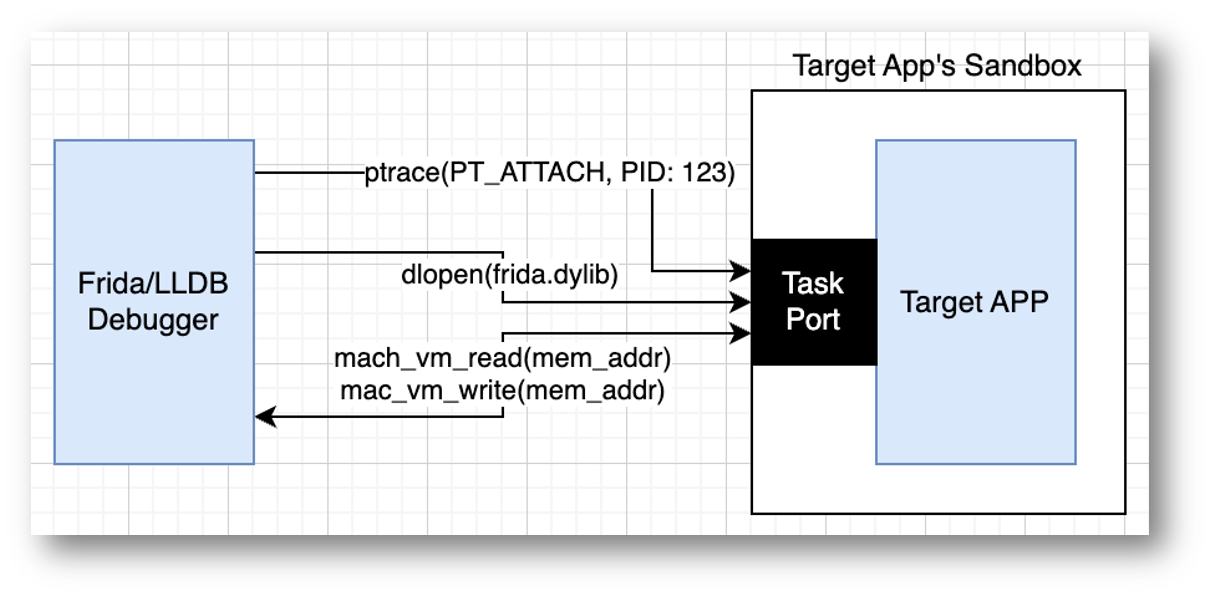
With the entitlement being set for the app, Frida/LLDB can call task_for_pid()syscall with the target process ID as an argument and gain access to the task port for the app.
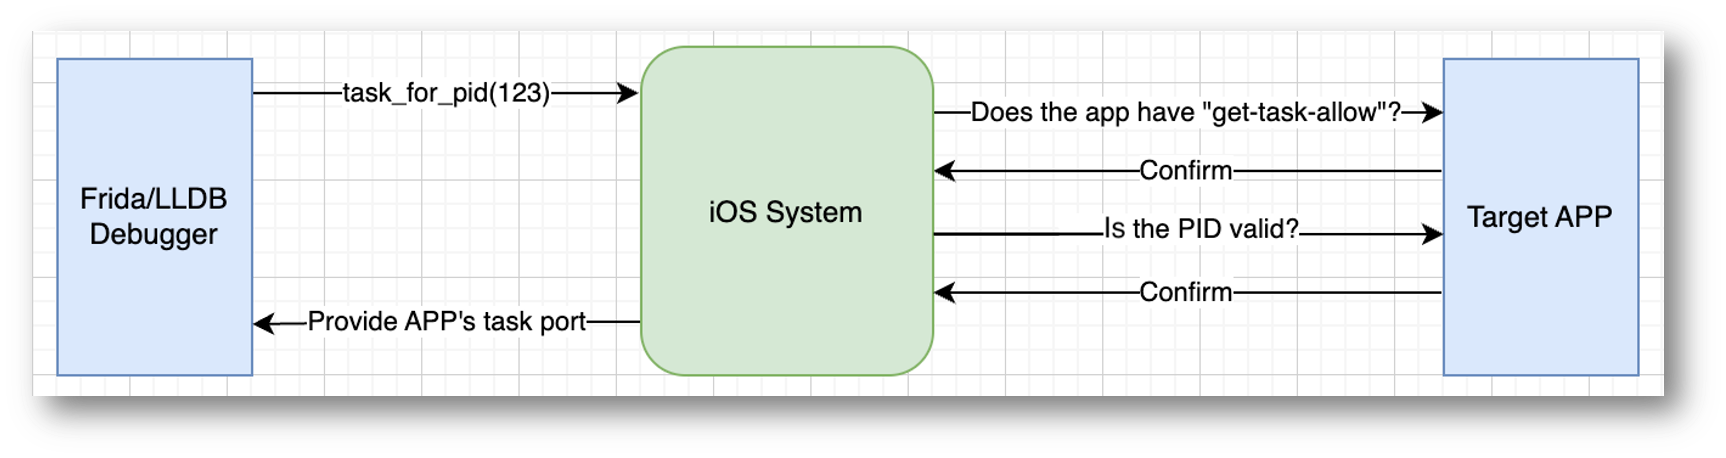
The task port is a communication channel that provides access to the app's sandbox. It can be used to call internal functions such as ptrace(), dlopen(), and memory read/write over the process:
In practice, the workflow depends on how the app is delivered. When provided as an IPA directly by the client, the app can be re-signed with one's provisioning profile that includes the get-task-allow entitlement, enabling runtime inspection. When the app is obtained through the App Store, however, the situation is more complex since the binary is encrypted with Apple's FairPlay DRM and must be decrypted before any re-signing could occur.
The decryption step still requires a jailbroken device (from here on, jb), as there is currently no alternative method due to hardware constraints. However, the device's iOS version can be lower than the version supported by the target app as we won't run it on that device.
Some IPAs, particularly builds targeting the latest iOS versions cannot be decrypted using the approaches and tools described here. Decrypting those artifacts may require additional research or cooperation with the app owner, and is outside the scope of this article.
Depending on the jurisdiction, decryption (bypassing FairPlay DRM) might not always be legal, so it is strongly recommended to obtain explicit permission for decryption from the application owners or get them to provide you with an unencrypted IPA.
Step 1. How to get the IPA?
The most straightforward option for engineers is for the application owner to provide an analysis-ready IPA (for example, signed with a provisioning profile that includes get-task-allow). This would allow for runtime inspection out of the box as it removes the need to handle App Store protections. However, delivering modified IPAs is often impractical given project timelines, release cycles, and coordination overhead. The reality is, that almost never happens. When an analysis-ready IPA cannot be provided, an agreed alternative is for the testing team to re-sign the supplied IPA (debug or production build) with their provisioning profile that enables get-task-allow, thereby permitting controlled runtime inspection.
In some cases, the application owner may not be able to provide any IPA at all. When this happens, engineers must work directly with the App Store version of the app. This approach comes with additional challenges, as App Store builds are fully signed by Apple and lack the get-task-allow entitlement. This method may be challenging, but it is the only option available under these circumstances.
To begin, the IPA must be retrieved from the App Store, typically using tools such as Apple Configurator or ipatool (both require macOS). The sections below will walk through each approach in detail.
ipatool (CLI)
The ipatool offers a straightforward command-line interface for retrieving the required IPA in several steps.
Authenticate with the App Store (it's not recommended to use your personal account):
$ ipatool auth login --email

INF email= name="Pentester" success=true
Download the IPA file by specifying the bundle identifier for the target app:
$ ipatool download -b your.nice.App --purchase

12:16PM INF output=../your.nice.app_v1.2.3.ipa purchased=true success=true
Apple Configurator (UI)
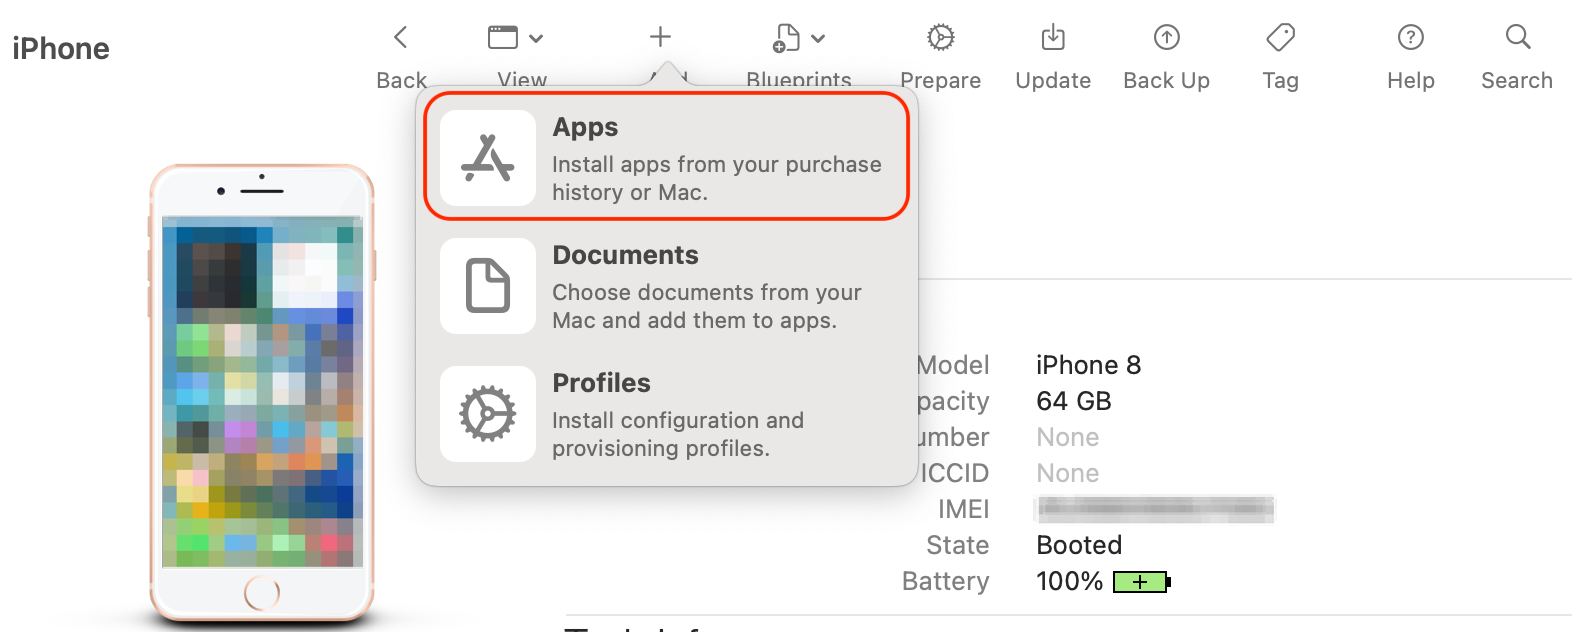
Apple Configurator offers a GUI for managing iOS devices at scale. It allows to install, update, and back up apps. Of particular interest to researchers, it allows retrieval of IPA files from apps installed on connected devices.
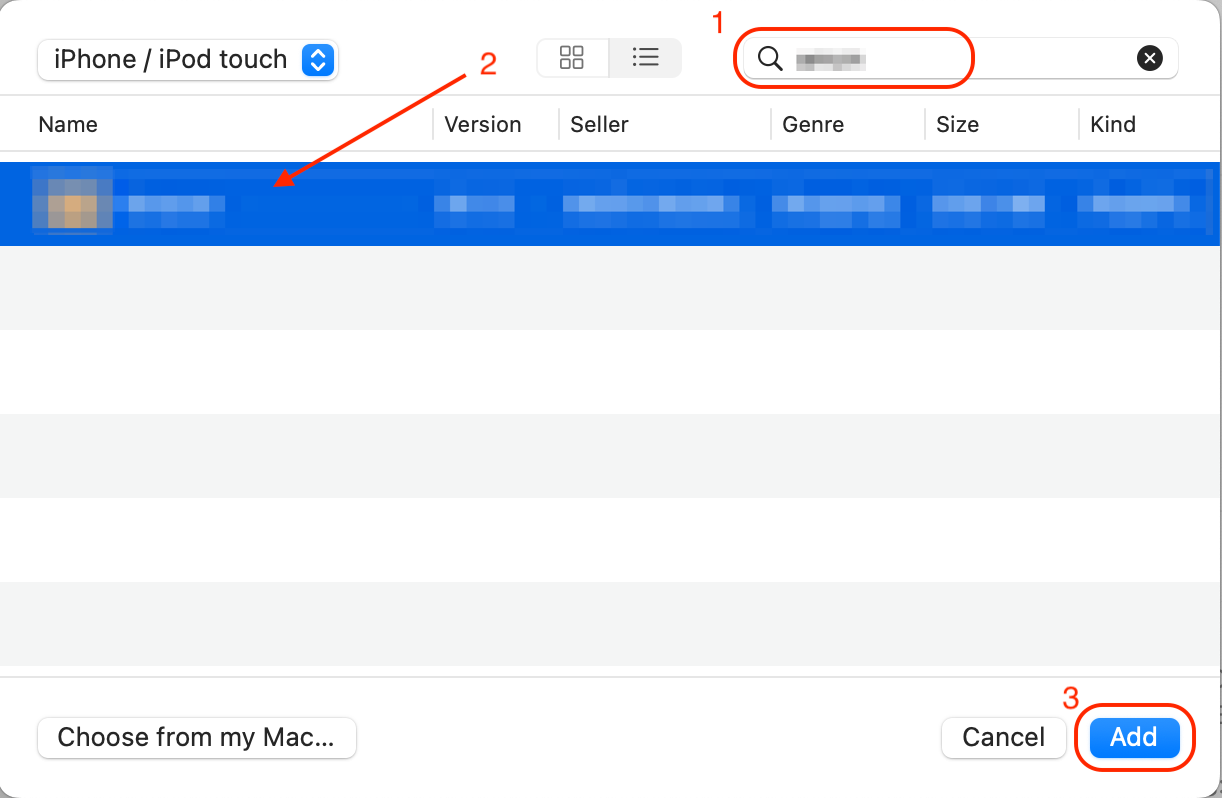
The first step is to install the target app via the App Store on your jailed device. After the app is installed, connect your device to Mac and run Apple Configurator. In the Configurator, select the device, then "Add" -> "Apps" and search for the app you installed.
It may take a while and multiple re-installations before you can see the app in the list, so be patient. After that, you can search for the app, select it from the list, and hit "Add":
If the app is already installed on your device, the Configurator will get stuck on this step and show the error:
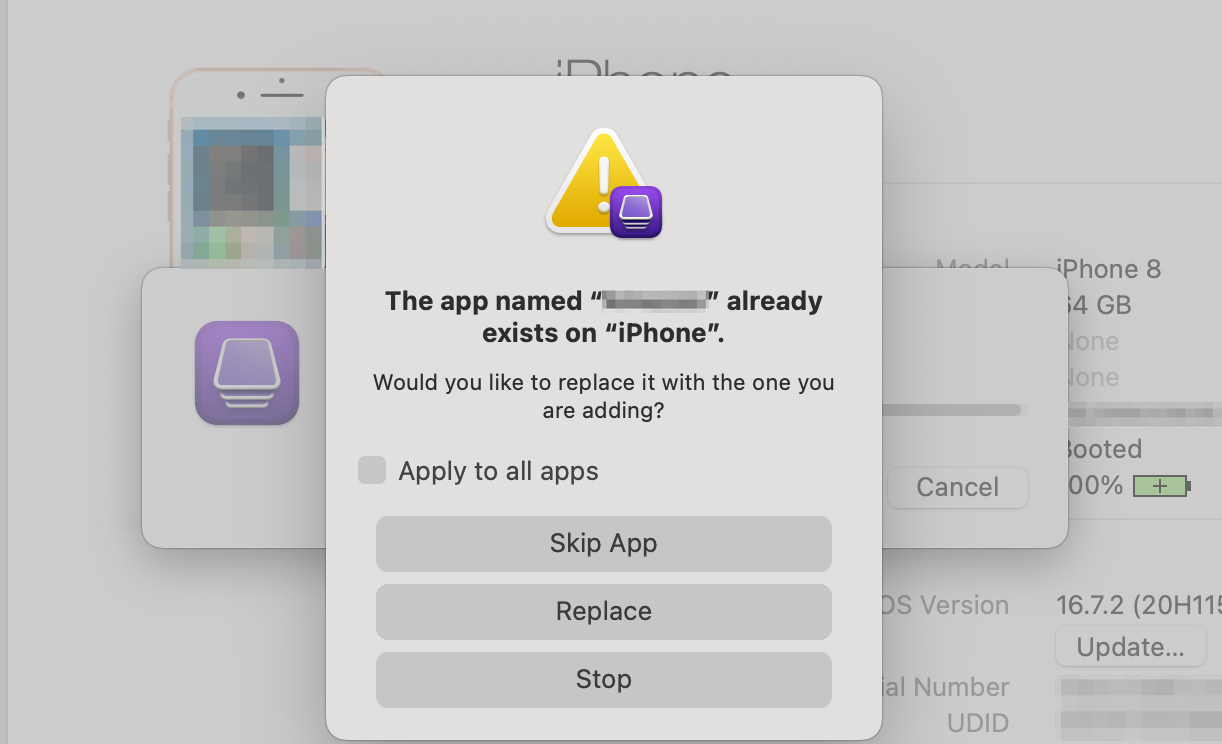
When this happens, use recursive search to find the target IPA in the Configurator's cache directory and copy it to your project folder, as the IPA will disappear from the cache directory after you close the Configurator.
$ ls -R ~/Library/Group\ Containers/K36BKF7T3D.group.com.apple.configurator/Library/Caches/Assets/TemporaryItems/MobileApps/

A1234B56-1111-222B-33CC-123456789D123

~/Library/Group\ Containers/K36BKF7T3D.group.com.apple.configurator/Library/Caches/Assets/TemporaryItems/MobileApps/A1234B56-1111-222B-33CC-123456789D123:

123456789

~/Library/Group\ Containers/K36BKF7T3D.group.com.apple.configurator/Library/Caches/Assets/TemporaryItems/MobileApps/A1234B56-1111-222B-33CC-123456789D123/123456789:

YourApp 1.2.3.ipa
If the downloaded IPA is quarantined by macOS, which is rare, but could happen, additional steps are required. This includes monitoring system logs, tracking the downloaded IPA, and running xattr to remove the extended attributes. We'll skip these steps in the article.
Step 2. IPA Decryption
Once the IPA is obtained, one may find that it is protected by Apple's FairPlay DRM. The DRM works by adding a special header to the binaries, which are then encrypted using Apple's App Store public key.
This means that all Mach-O files within the app bundle cannot be analyzed or instrumented until they are decrypted. The encryption can be checked with otool by searching for LC_ENCRYPTION_INFO header among the load commands. Look for cryptid 1 in the output, indicating that the encryption is in place.
$ otool -l ./your.nice.app_v1.0/Payload/YourApp.app/YourAppBinary  | grep -A 4 LC_ENCRYPTION_INFO

          cmd LC_ENCRYPTION_INFO_64
      cmdsize 24
     cryptoff 16384
    cryptsize 17956864
      cryptid 1
To perform decryption, the binary must first be loaded on a device that is entitled to execute the app (iPhone or iPad). This is because the decryption keys are only available in memory at runtime on devices authorized by Apple (hardware constraint).
Align MinimumOSVersion with your jb device's iOS version
Since the app is designed for a higher iOS version than what is running on the jb device, it needs to be adjusted first. This involves changing the MinimumOSVersion property in the app's Info.plist file to match the jb device's iOS version. This allows the system to recognize the app as installable and prevents installation errors.
This change will also break the app's signature. However, on a jailbroken device, this can be easily bypassed, as demonstrated later in the article.
First, extract the package files. This can be done with unzip since an IPA is essentially a ZIP archive with a specific structure.
$ unzip YourApp.ipa -d extracted/
Then, the MinimumOSVersion setting can be modified using the plutil. First, check the current value:
$ plutil -p extracted/Payload/YourApp.app/Info.plist | grep MinimumOSVersion

  "MinimumOSVersion" => "17.0"
The jb device was running iOS 16.7.2, so let's set it to match:
$ plutil -replace MinimumOSVersion -string "16.7" extracted/Payload/YourApp.app/Info.plist
Confirm that the version is changed:
$ plutil -p extracted/Payload/YourApp.app/Info.plist | grep MinimumOSVersion

  "MinimumOSVersion" => "16.7"
Finally, re-assemble the archive and install the app on the jb device:
$ cd extracted/
$ zip -r ../YourApp-encrypted.ipa Payload/
To install the app, ideviceinstaller can be used:
$ ideviceinstaller -i YourApp-modified.ipa
Alternatively, ios-deploy can be used directly on the extracted application folder:
$ ios-deploy --bundle extracted/Payload/YourApp.app -W -d
If you get an error like the following, your jb device is missing a tweak that allows installation of apps with invalid signatures:
Install: VerifyingApplication (40%)ERROR: Install failed. Got error "ApplicationVerificationFailed" with code 0xe8008001: Failed to verify code signature of /var/installd/Library/Caches/com.apple.mobile.installd.staging/temp.9c35hT/extracted/Payload/YourApp.app : 0xe8008001 (An unknown error has occurred.)
To resolve the issue, install a tweak that allows to bypass the signature validation, such as AppSync Unified. Mind the versions - iphoneos-arm for "rootful" jailbreaks and iphoneos-arm64 for "rootless".
If everything is set up properly, the app should install successfully:
Installing 'my.nice.App'
Install: CreatingStagingDirectory (5%)
Install: ExtractingPackage (15%)
Install: InspectingPackage (20%)
Install: PreflightingApplication (30%)
Install: VerifyingApplication (40%)
Install: CreatingContainer (50%)
Install: InstallingApplication (60%)
Install: PostflightingApplication (70%)
Install: SandboxingApplication (80%)
Install: GeneratingApplicationMap (90%)
Install: InstallComplete (100%)
Install: Complete
Choose the right tool
Once the app is installed, we can attempt the decryption by dumping the deciphered executable regions from the device memory. Generally, there are two approaches for this: tracing the process and injecting a dynamic library. For the first one, we need a tool to attach to the already running process. This is how well-known tools like Clutch and frida-ios-dump work. However, since we are not able to run the app (remember the app requires higher iOS version to run), these tools are unsuitable for our specific scenario.
Here is where dynamic library injection comes into play. This approach is based on the DYLD_INSERT_LIBRARIES environment variable that allows linking dynamic libraries to the application process. When loaded, the library locates the encrypted code sections, calls into the kernel using mremap_encrypted syscall to request that a specific encrypted region be mapped into memory. Finally, it writes them back to the file, effectively replacing the encrypted binary with its decrypted version. The original approach was introduced with dumpdecrypted tool by Stefan Esser in the early 2010s.
The tool spawned many clones and successors during the years, but all the older implementations based on mremap_encrypted could not accept non-aligned addresses, making them unsuitable for decrypting most applications targeting iOS 14 and higher. This happened when Apple changed how memory regions were mapped starting around that version.
Fortunately, we have a newer tool called Fouldecrypt that specifically addressed the challenges of older versions of dumpdecrypted. The tool decrypts one binary at a time, so if there're multiple binaries, the tool must be executed on each of them. This can be done manually or with a wrapper such as flexdump.
Decryption with Fouldecrypt & flexdump
First, install Fouldecrypt. It is worth mentioning that if the jailbreak is "rootless", app's repathing is required for installation. This is because in a "rootless" setup, the root filesystem is read-only. Therefore, tweaks must install their files into the writable /var/ partition instead of the root one as it was implemented in older "rootful" jailbreaks. If you only have an old build that relies on the root partition, the easiest way to convert it is to use tools like Derootifier.
The modified package can then be installed with dpkg:
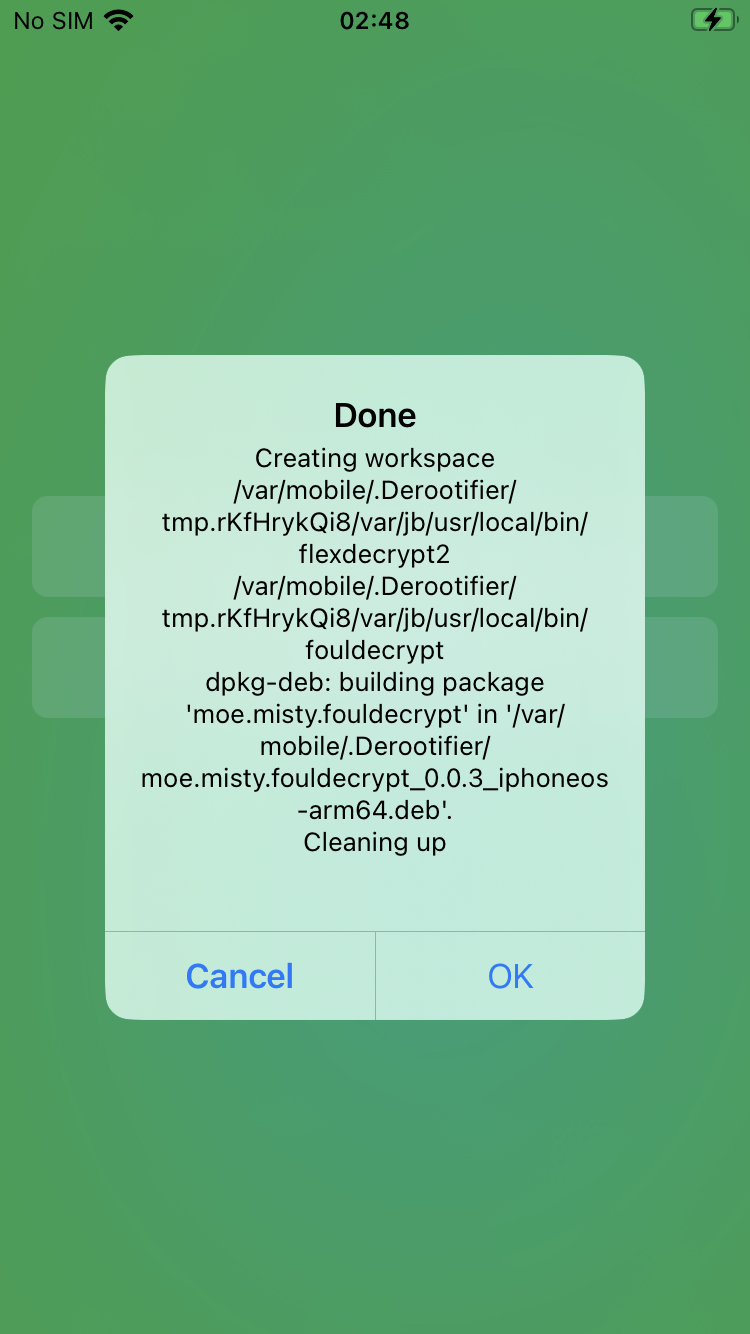
% sudo dpkg -i moe.misty.fouldecrypt_0.0.3_iphoneos-arm64.deb

Selecting previously unselected package moe.misty.fouldecrypt.
(Reading database ... 19776 files and directories currently installed.)
Preparing to unpack moe.misty.fouldecrypt_0.0.3_iphoneos-arm64.deb ...
Unpacking moe.misty.fouldecrypt (0.0.3) ...
Setting up moe.misty.fouldecrypt (0.0.3) ...
Confirm that the package is installed by calling flexdecrypt2:
$ flexdecrypt2

usage: flexdecrypt2 [-v] encfile
Next, we'll use flexdump. To list the installed apps, use list command:
% ./flexdump.sh list
  _____ _              _
 |  ___| | _____  ____| |_   _ _ __ ___  _ __
 | |_  | |/ _ \ \/ / _` | | | | '_ ` _ \| '_ \
 |  _| | |  __/>  < (_| | |_| | | | | | | |_) |
 |_|   |_|\___/_/\_\__,_|\__,_|_| |_| |_| .__/
                                        |_|

                                 by @defparam

[+] Application List:
[+] -----------------
[+] MobileTimer.app
[+] FaceTime.app
[+] Calculator.app
[+] AppleTV.app
[+] Fitness.app
[+] News.app
[+] Weather.app
[+] MyApp.app
[...]
Select the target and decrypt it with the dump command:
% sudo ./flexdump.sh dump MyApp.app

[+] Searching for MyApp.app...
[+] Found app at: /private/var/containers/Bundle/Application/AA111111-B22B-3D33-C444-5555C5C5555C/MyApp.app
[+] App name: MyApp
[+] App version: 1.2.3
[+] Preparing working directory at: /tmp/tmp.tjHHozG7YS/Payload
[+] Copying application to: /tmp/tmp.tjHHozG7YS/Payload/MyApp.app , please wait...
[+] Decrypting and signing binaries...
[...]
[+] Packaging final IPA file...
[+] Generated: /var/root/dump/MyApp_1.2.3_fd.ipa
[+] Done!
After the decryption is done, the output archive can be found in /var/root/dump/ folder:
$ file /var/root/dump/MyApp_1.2.3_fd.ipa

/var/root/dump/MyApp_1.2.3_fd.ipa: Zip archive data, at least v1.0 to extract, compression method=store
Fetch the decrypted IPA with scp:
$ scp mobile@:/var/root/dump/MyApp_1.2.3_fd.ipa .
Automated Decryption over SSH (IPAAutoDec)
At tech companies, project timelines are often tight, and with the rise of remote work, a jb device is not always physically available. The methods described above involve several steps, including setting up the environment, installing the target app, running the utility, fetching the package back, all of which can add valuable time to the process.
To overcome these logistical challenges and give engineers a more straightforward and efficient decryption workflow, Anvil introduced a wrapper called IPAAutoDec. This tool automates the manual setup and streamlines the process of decrypting, allowing engineers to focus on analysis rather than environment configuration and decryption. Having a remote jb ("rootful" or "rootless") device available only over SSH, without any tweaks installed, it is possible to receive the decrypted app without any user's interaction with the jb environment itself.
The utility can be run from the command line of your laptop/workstation as follows:
$ ./ipa_auto_dec.sh
Usage: ./ipa_auto_dec.sh -h  -l  -u  -p  -i
Once executed, the script connects to the device via SSH, verifies the dependencies and installs missing ones, then uploads and installs the IPA. It then performs the decryption and returns the decrypted IPA ready for the next step of testing.
The successful output from the tool looks like this:
$ ./ipa_auto_dec.sh -h  -i ./MyApp\ 1.2.3.ipa -u  -p

[+] Port not specified, using default port 22.

====== Checking Dependencies ======
[+] Checking for fouldecrypt on the device...
[+] fouldecrypt is present.
[+] Checking for appinst on the device...
[+] appinst is present.

====== Uploading ======
[+] Connecting to the device...
[+] Pushing IPA file to the device...
[SUCCESS] IPA file pushed successfully to /tmp/tmp.AqaJlY/MyApp 1.2.3.ipa

====== Installation ======
[+] Installing IPA on the device...
[SUCCESS] IPA installed successfully.

====== Decryption ======
[+] Preparing installed app for decryption
[+] Creating temporary directory on device for decryption...
[+] Created temporary directory /tmp/tmp.a3125t
[+] Uploading remote scripts to device...
[+] Remote scripts uploaded to /tmp/ipa_scripts
[+] Extracting bundle identifier from IPA...
[+] Bundle identifier: my.nice.App
[+] Installed app path: /private/var/containers/Bundle/Application/A1111111-2222-33B3-444C-55555DDD555D/MyApp.app
[+] Installed app copied to: '/tmp/tmp.a3125t/Payload/'
[+] Decrypting: /private/var/containers/Bundle/Application/A1111111-2222-33B3-444C-55555DDD555D/MyApp.app/PlugIns/ExtensionA.appex/ExtensionA
[+] Signing: /tmp/tmp.a3125t/Payload/MyApp.app/PlugIns/ExtensionB.appex/ExtensionB
[...]
[+] Decryption complete. Decrypted app is in /tmp/tmp.a3125t
[SUCCESS] Generated decrypted IPA: /tmp/tmp.a3125t/MyApp 1.2.3_decrypted.ipa

====== Pulling IPA ======
[+] Pulling IPA file back from device...
[SUCCESS] Pulled IPA file back from device: MyApp 1.2.3_decrypted.ipa
As a result, you will see the decrypted IPA in the local folder:
$ file MyApp\ 1.2.3_decrypted.ipa

MyApp 1.2.3_decrypted.ipa: Zip archive data, at least v1.0 to extract, compression method=store
Step 3. IPA Re-signing
Once the IPA is decrypted (if it was encrypted), the next step is to re-sign it with a development provisioning profile that includes the get-task-allow entitlement. As it was mentioned in the introduction, this enables runtime inspection capabilities.
There are multiple tools that can assist us with re-signing. However, all of them require a valid signing profile (a file issued by Apple that, among others, contains information about the developer account, the allowed app ID(s), the devices on which the app can run). Fortunately, Apple offers free developer signing profiles for all accounts through Xcode.
Obtaining signing profile
Launch Xcode and follow the steps for creating a new iOS app project. If this is your first time working with Xcode, you'll be prompted to select a development team via "Add account..." button:
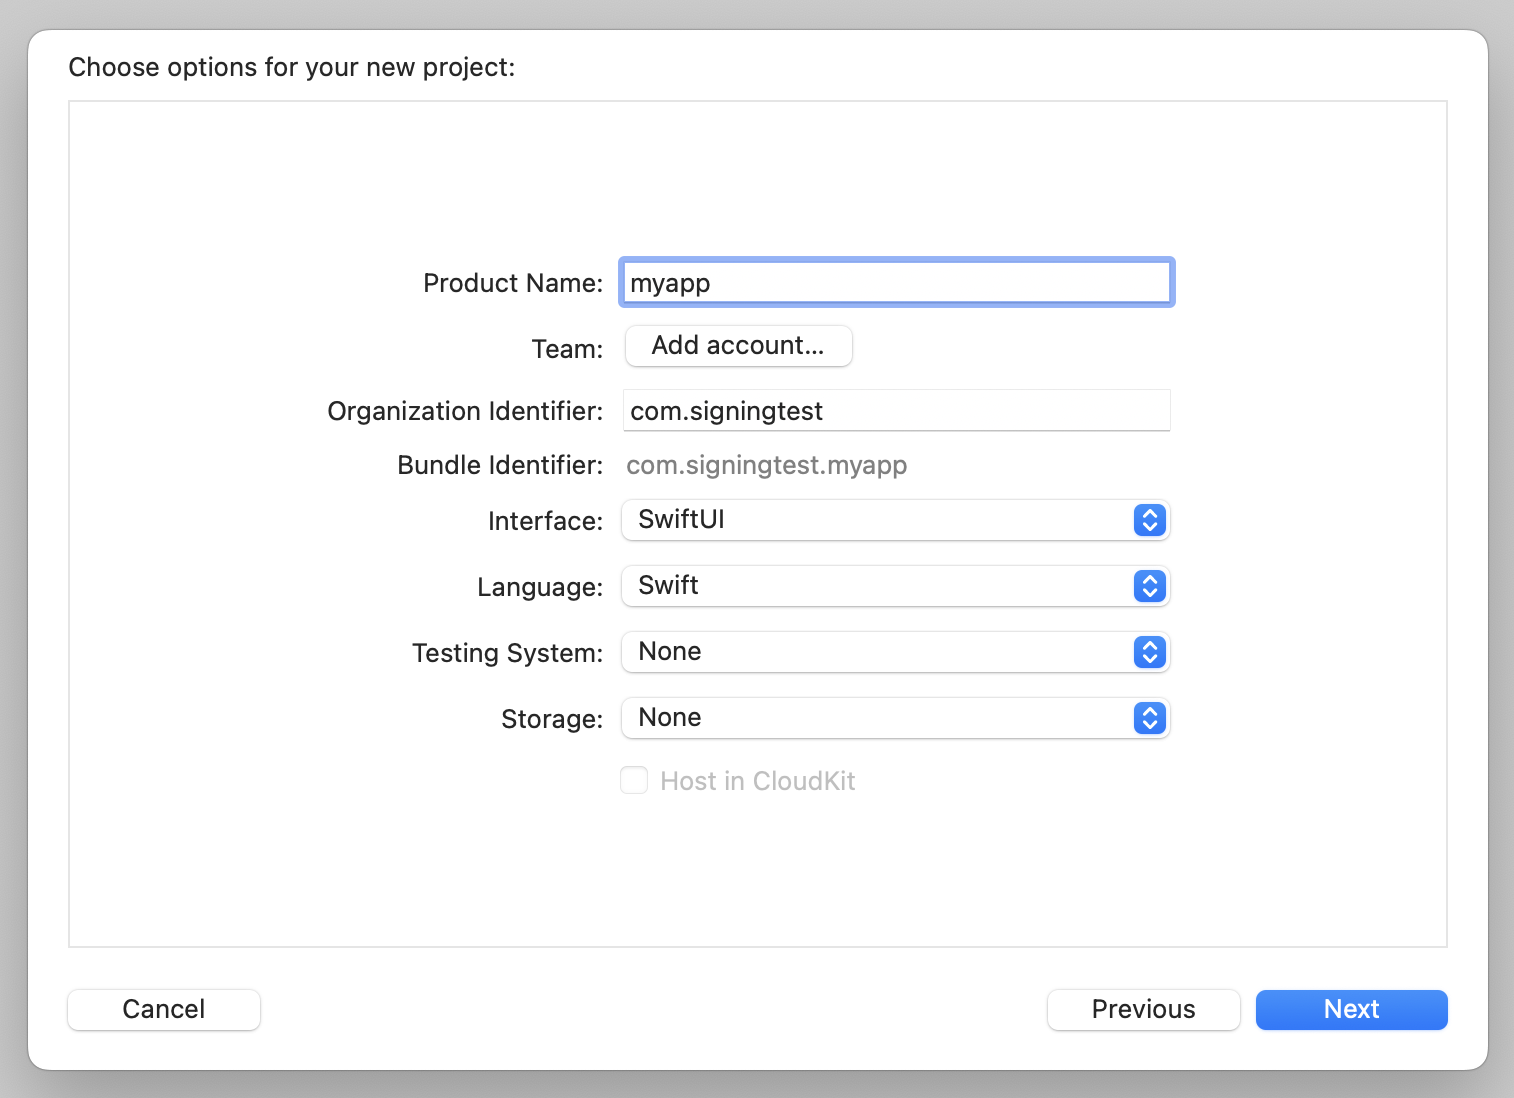
When prompted, sign in with your Apple ID (it's recommended to create a dedicated testing account for this) and add a Personal Team. After that, it will be possible to select that team in the dropdown list. Complete creating the project by following the Xcode instructions. As a result, a default project with "Hello World!" app should appear.
Next, we will need to set up the testing jailed iPhone by enabling the Developer Mode. Pair the devices and check the state of the Developer Mode by navigating to Xcode -> "Window" -> "Devices and Simulators". If the Developer Mode is disabled, you'll see the following error:
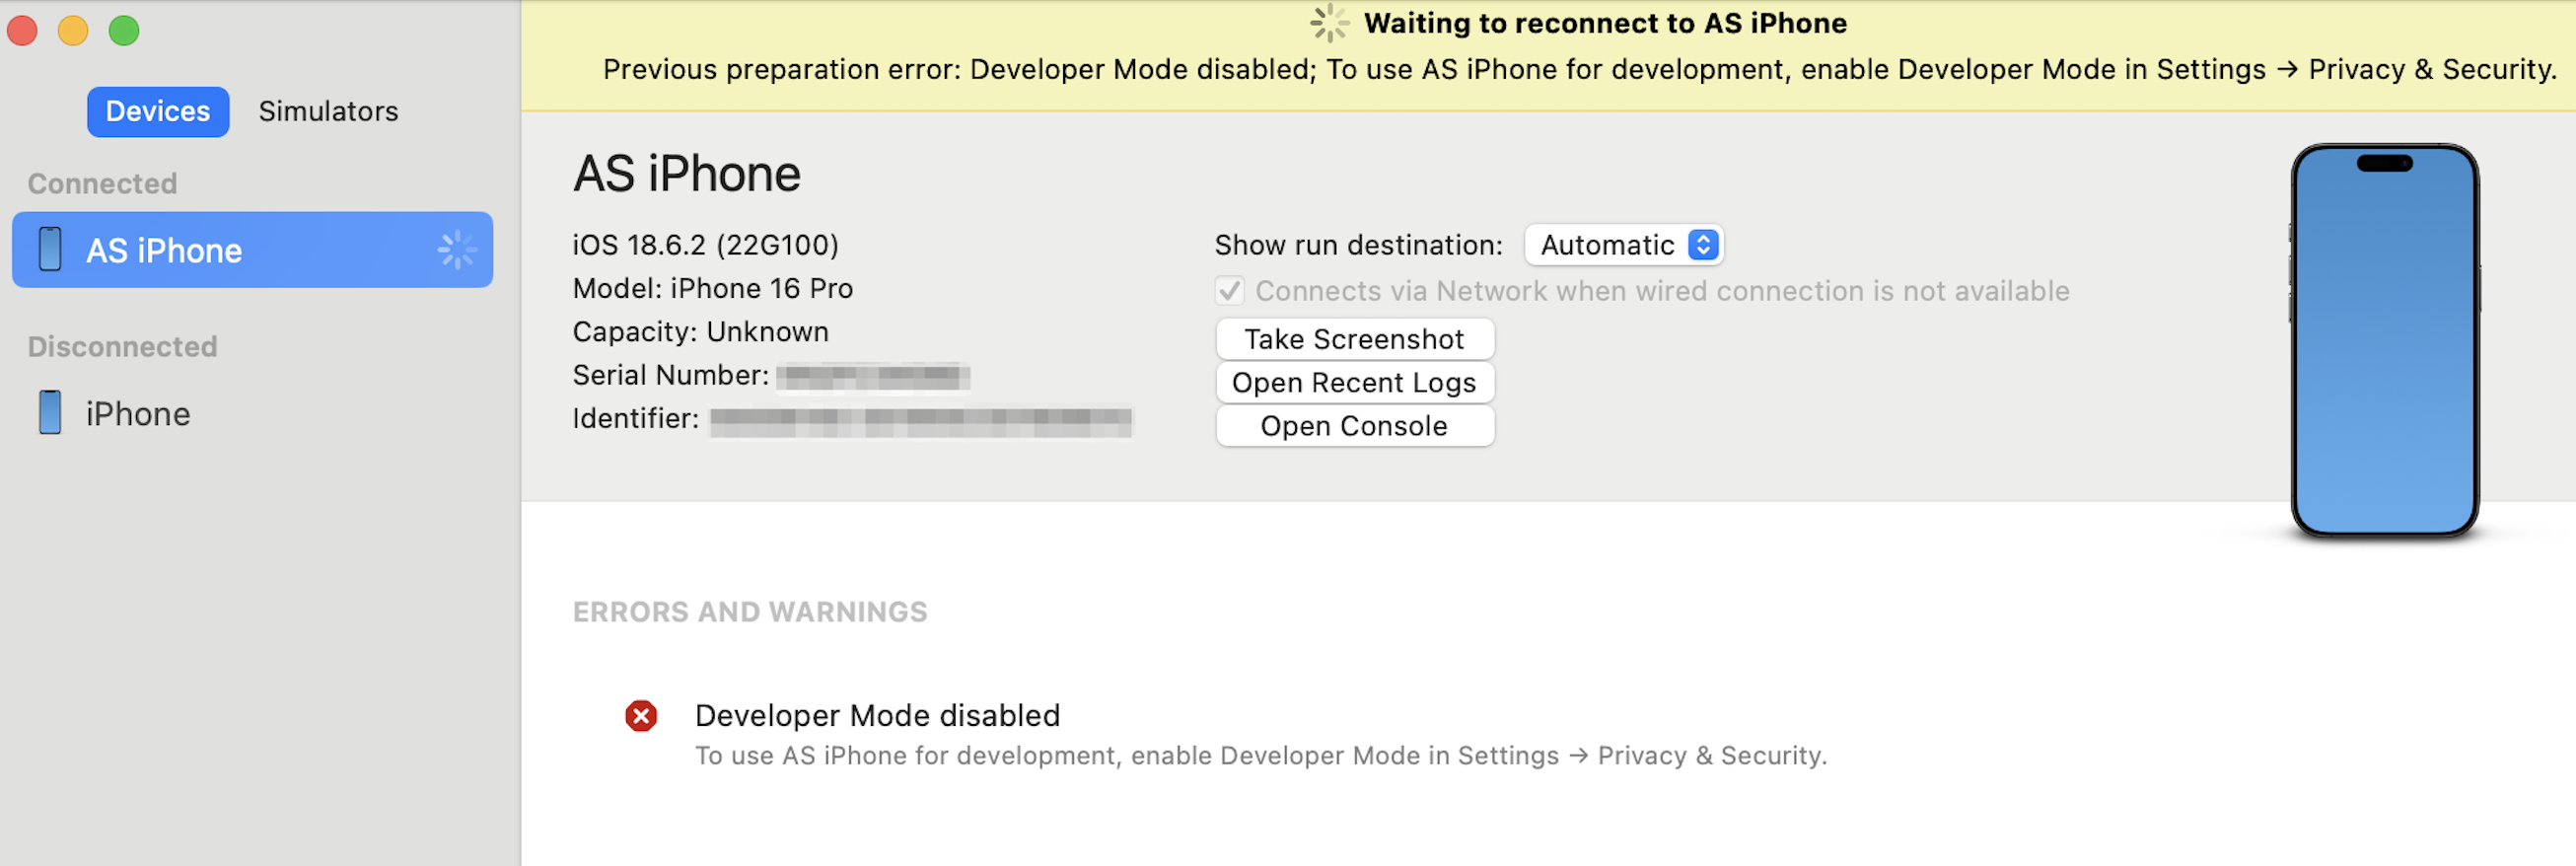
Switch to the iPhone and navigate to "Settings" -> "Privacy & Security" -> "Developer Mode". When the prompt to restart the iPhone is displayed, hit "Continue". After rebooting, confirm enabling the Developer Mode by following the on-screen instructions. After that, the error should disappear from the Xcode.
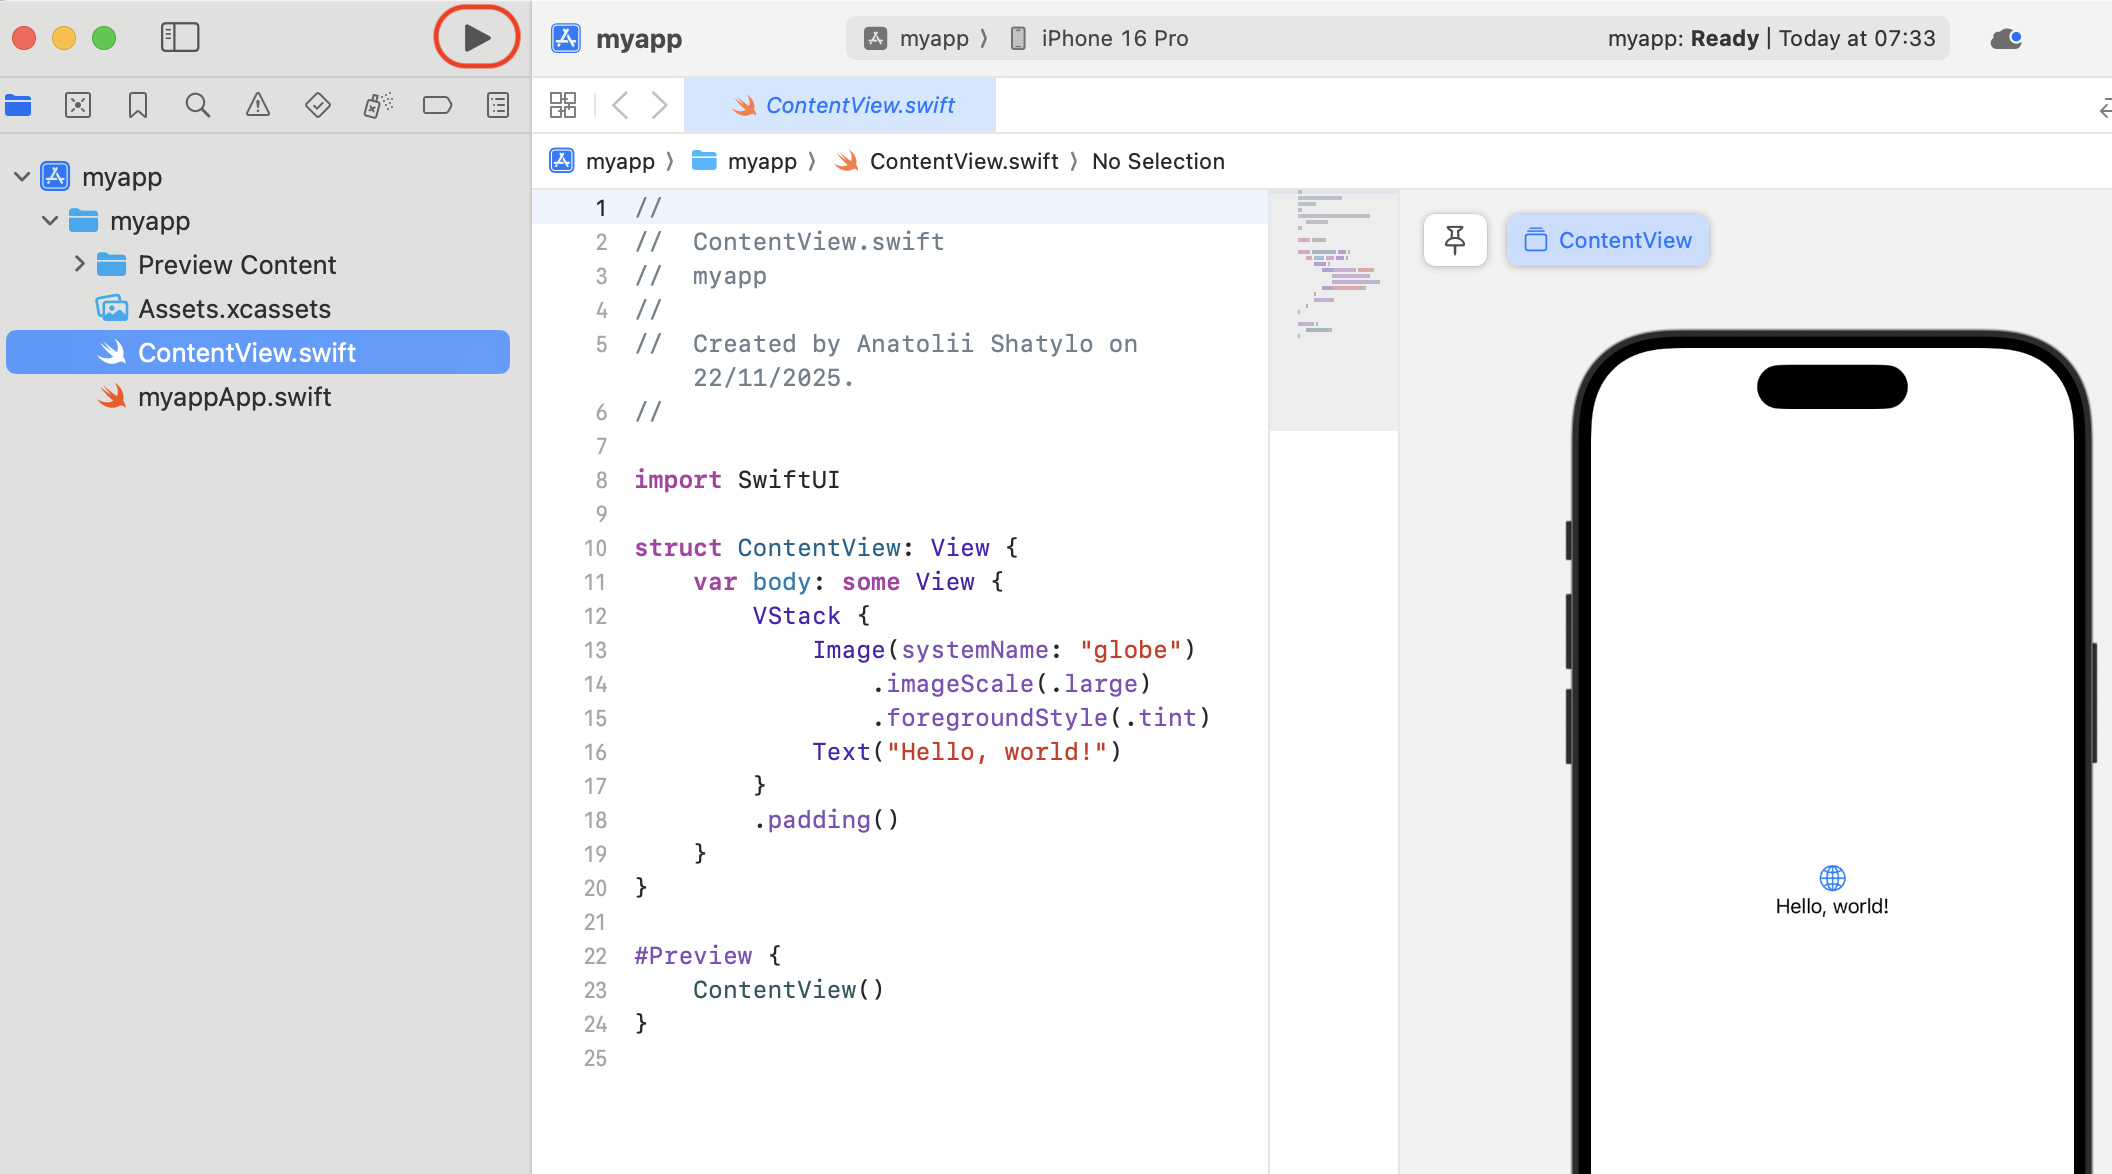
When the iPhone is in the proper state, open the Xcode project window and click the "Play" button to build and deploy the "Hello World" app. This action will trigger Xcode to generate the provisioning profile associated with your Apple ID, which you can then use for the re-signing step.
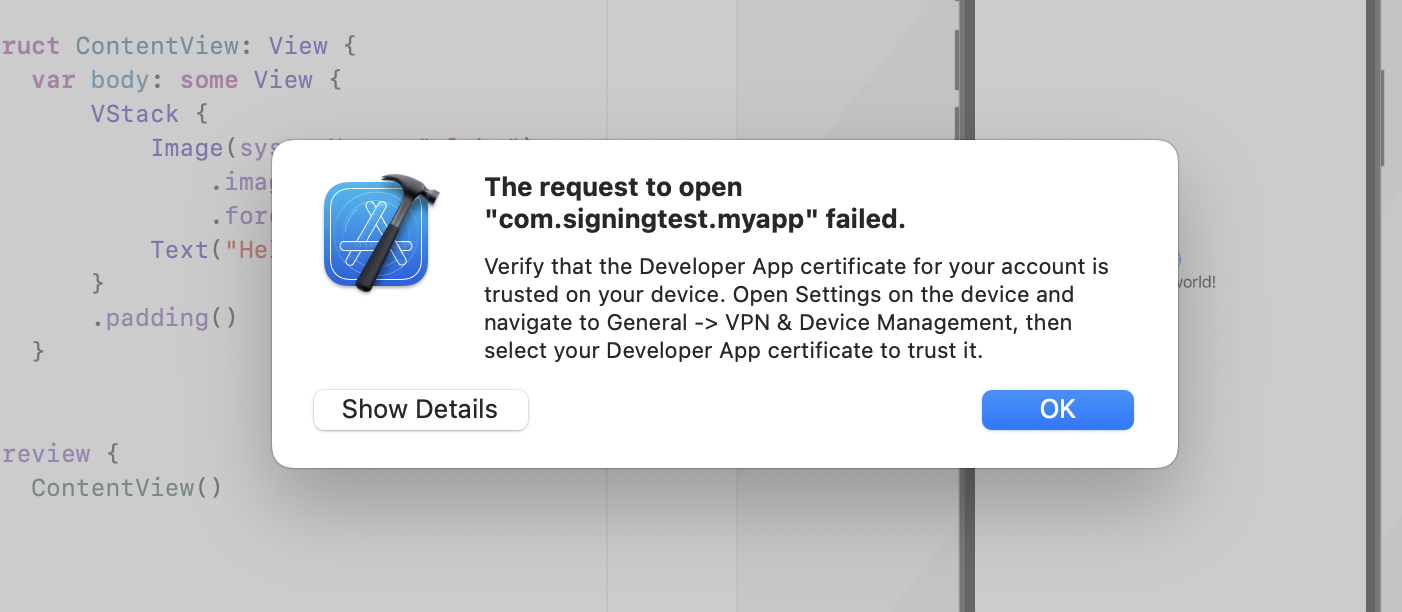
The following error will be displayed in Xcode to ensure the certificate for your developer account is trusted. Follow the instructions and trust the developer in the iPhone settings.
Once you click the "Play" button again, the "Hello World" app should appear on your iPhone. If it launches successfully, it confirms that the provisioning profile was generated correctly. Now, the provisioning profile can be found in the following location:
% ls ~/Library/Developer/Xcode/UserData/Provisioning\ Profiles

a1234567-abc1-1234-5678-a123456abcd1.mobileprovision
Re-signing with the entitlement
There are several tools available for re-signing, each offering different levels of flexibility. These include Fastlane's resign, ios-app-signer, and isign. Among these, the ios-app-signer offers the most straightforward experience for re-signing with get-task-allow, allowing you to enable the setting through a checkbox. We'll use this tool as an example.
Launch the ios-app-signer and set the required inputs:
-
Decrypted IPA
-
Signing certificate - should be pre-populated by the tool
-
Provisioning profile from the previous step
-
"No get-task-allow" must be unticked
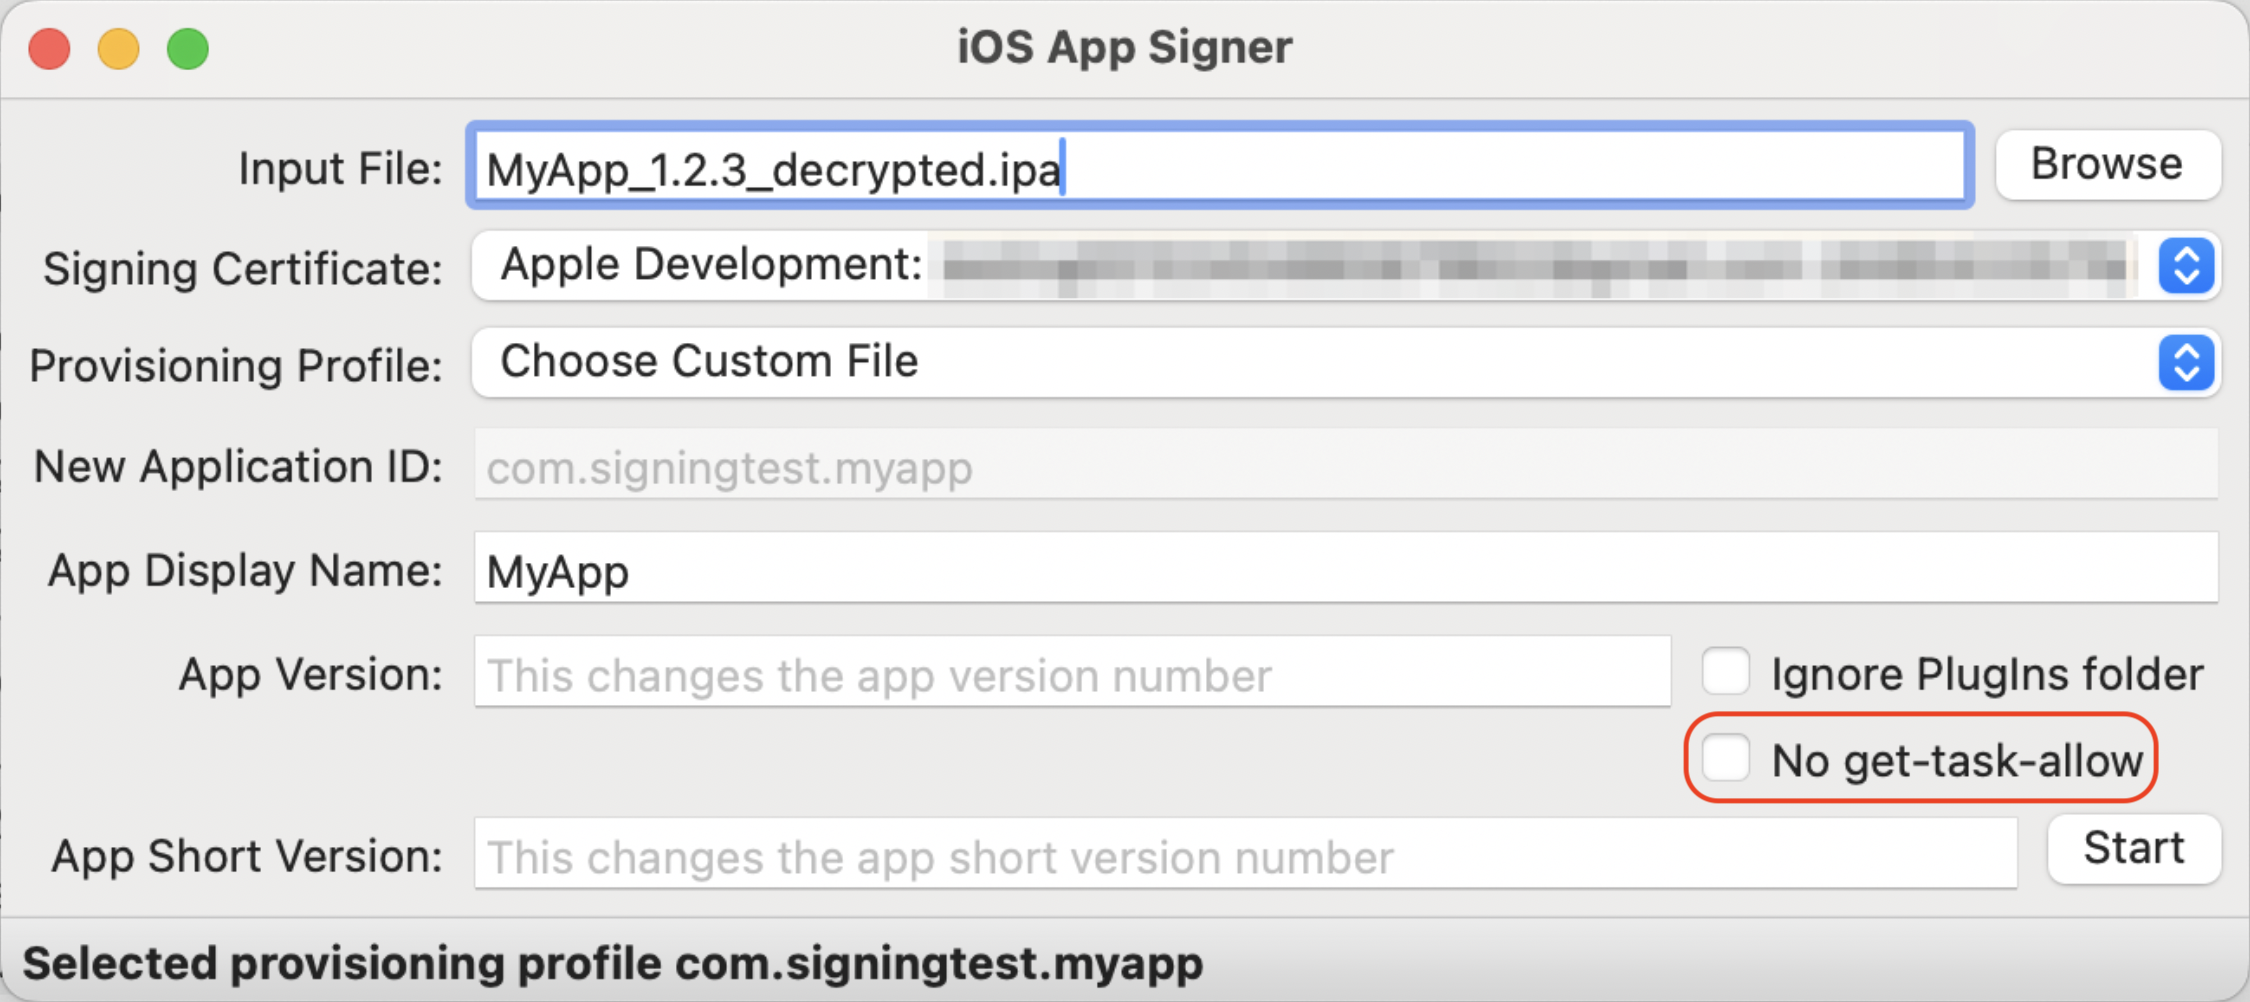
After hitting "Start", select the output location. Once the re-signing is completed, the re-signed IPA file can be found in the desired location.
Install the re-signed IPA
Deploy the IPA to the jailed iPhone:
$ ideviceinstaller -i MyApp\ 1.2.3_resigned.ipa

[...]
Install: InstallingApplication (60%)
Install: PostflightingApplication (70%)
Install: SandboxingApplication (80%)
Install: GeneratingApplicationMap (90%)
Install: InstallComplete (100%)
Install: Complete
Step 4. Reviewing results
After completing the steps above, the app should be available on the jailed device with debugging capabilities enabled. This allows us to:
-
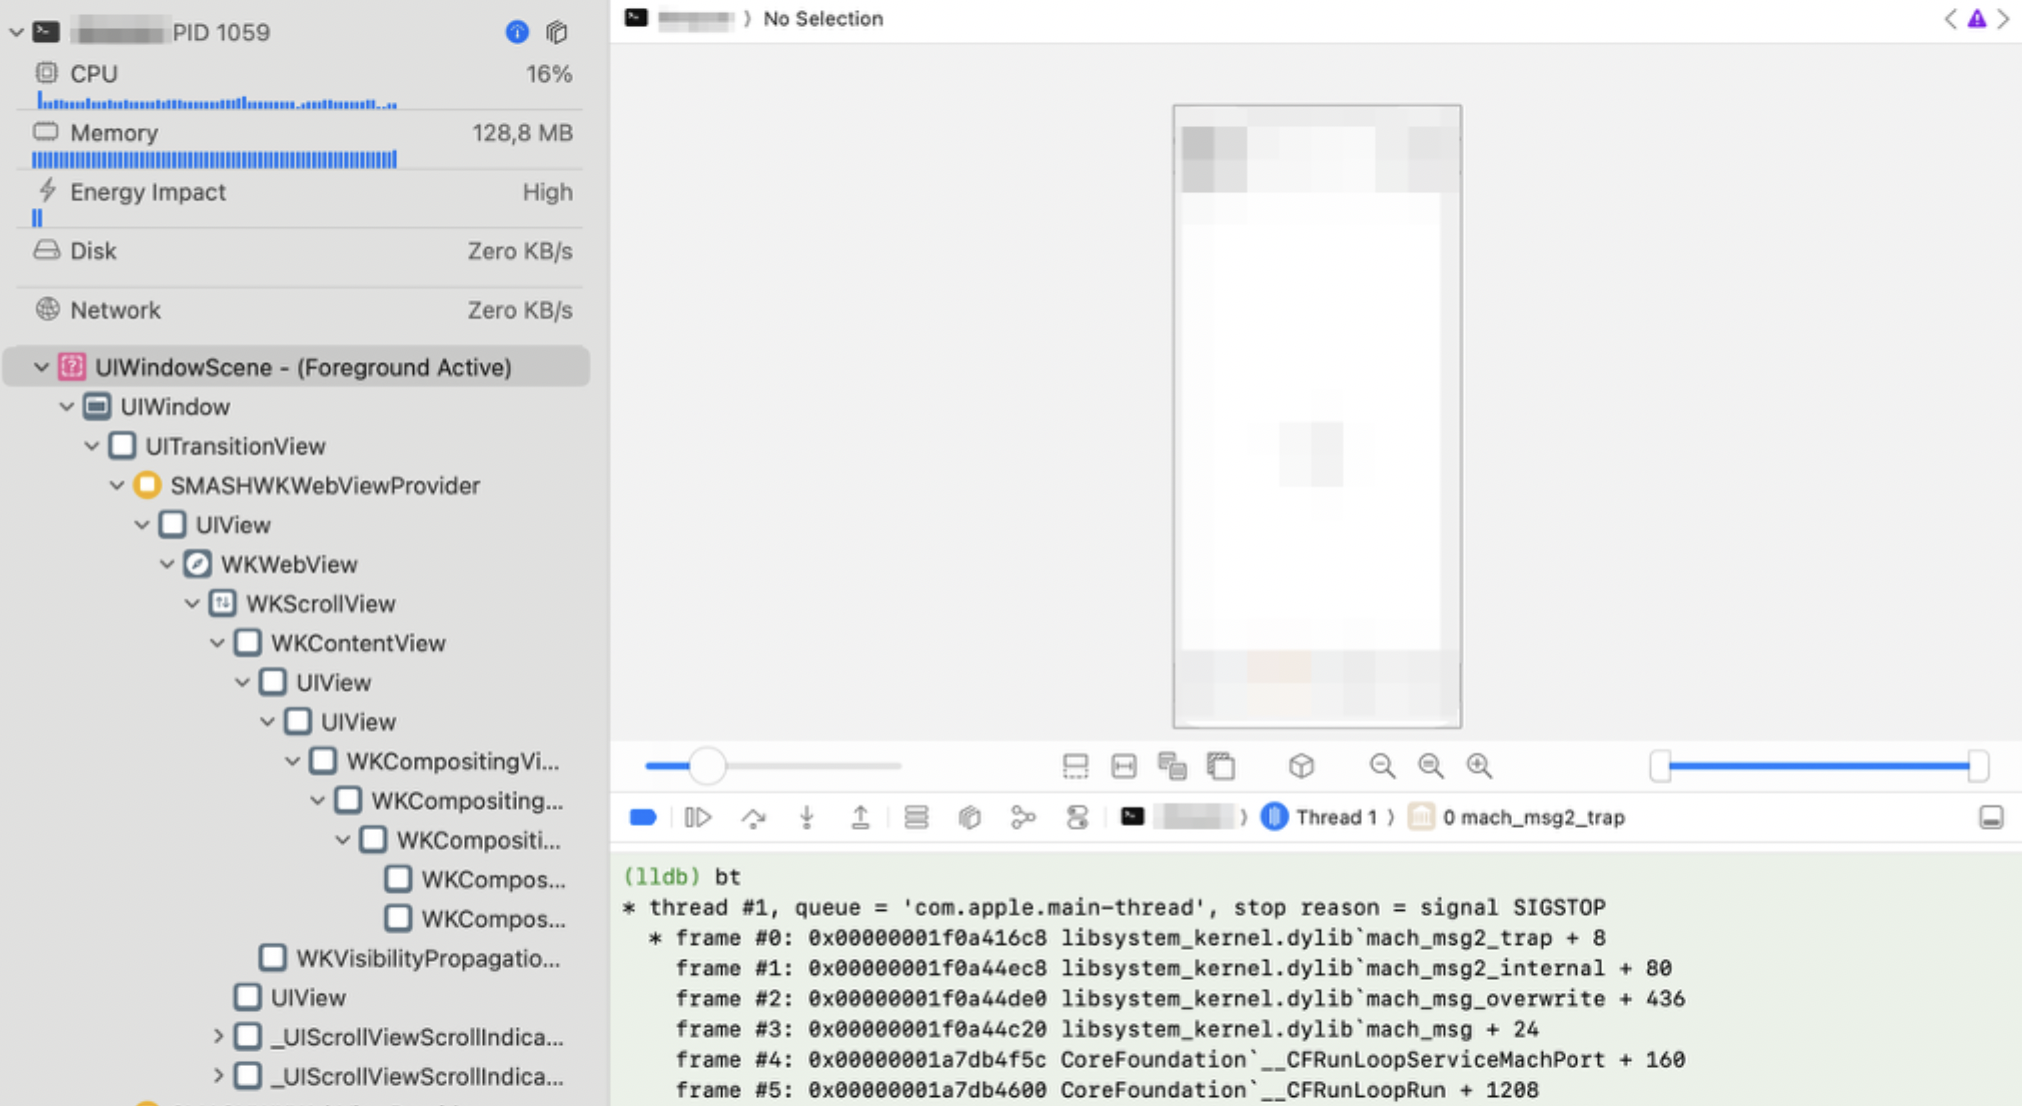
Attach debuggers: The LLDB debugger can be attached via Xcode -> "Debug" -> "Attach to process". Call
btto show the current thread's call stack:
-
Perform runtime instrumentation: Use Frida's "Without Jailbreak" mode and tools like igf and frida-trace to inspect the app and modify its behavior. Don't forget to put the latest Frida Gadget to the user's cache directory (
~/.cache/frida/gadget-ios.dylibon macOS).
% frida-trace -U MyApp -I "libcommonCrypto*"
Instrumenting...
CCRSACryptorVerify: Auto-generated handler at ".../__handlers__/libcommonCrypto.dylib/CCRSACryptorVerify.js"
CCCKGContributorCommit: Auto-generated handler at ".../__handlers__/libcommonCrypto.dylib/CCCKGContributorCommit.js"
CCCKG2ContributorDestroy: Auto-generated handler at ".../__handlers__/libcommonCrypto.dylib/CCCKG2ContributorDestroy.js"
MD5Final: Auto-generated handler at ".../__handlers__/libcommonCrypto.dylib/MD5Final.js"
CC_MD4: Auto-generated handler at ".../__handlers__/libcommonCrypto.dylib/CC_MD4.js"
CC_SHA256_Final: Auto-generated handler at ".../__handlers__/libcommonCrypto.dylib/CC_SHA256_Final.js"
[...]
Started tracing 241 functions. Web UI available at http://localhost:50344/
           /* TID 0x103 */
   309 ms  CCDHRelease()
   309 ms  CCDHRelease()
   309 ms  CCDHRelease()
   309 ms  CCDHRelease()
   309 ms  CCDHRelease()
   309 ms  CCDHRelease()
[...]
When using iOS 18.4+ for testing, you may encounter the following error with Frida-based tools like objection: "Unable to connect to the frida server: unsupported iOS version (initializeMainExecutable not found)". This happens because of the change in the libdyld_initialize function. Updating the tools to the latest versions should resolve the issue.
Summary
In the article, we saw how to perform iOS app analysis without requiring an up-to-date jb device for running the target app. The key steps involve:
-
Obtaining the IPA (from App Store): Using tools like
ipatoolor Apple Configurator to retrieve App Store applications -
IPA Decryption: Using an old jb device to decrypt FairPlay-protected binaries
-
IPA Re-signing: Adding the
get-task-allowentitlement to enable debugging capabilities -
Performing the analysis: Analyze the app with LLDB debugger and Frida on a jailed device